Always On VPN provides a single, cohesive solution for remote access and supports domain-joined, non-domain-joined (workgroup), or Azure AD–joined devices, even personally owned devices. With Always On VPN, the connection type does not have to be exclusively user or device but can be a combination of both. For example, you could enable device authentication for remote device management, and then enable user authentication for connectivity to internal company sites and services.
The purpose for this guide is to demonstrate how to deploy the Always On feature easily. In this guide we will deploy the following platforms primarily using PowerShell where possible:
- Active Directory (AD DS)
- DNS
- Certificate Authority (AD CS)
- DHCP
- Routing and Remote Access Service (RRAS)
- Network Policy Server (RADIUS)
It will not be demonstrated how to install Windows Server or Windows 10 operating system.
Do not attempt to deploy Remote Access on a virtual machine (VM) in Microsoft Azure. Using Remote Access in Microsoft Azure is not supported, including both Remote Access VPN and DirectAccess.
Conditional access through Azure AD will not be demonstrated in this guide, but see the following resource for that:
Target Audience
This guide is targeted to operations engineers in Microsoft Server products. The target needs to have knowledge in the following technologies:
- PowerShell
- Windows Server
- Windows 10
The target also need to have some basic understanding of:
- DHCP
- DNS
- Active Directory (AD DS)
- PKI infrastructure (AD CS)
- VPN (IKEv2/SSTP)
- Network Knowledge (IP, UDP, TCP)
- RADIUS
- Hypervisors (Virtualbox, VMware, HyperV)
Definitions
In the tutorial I will use short names, so here is a brief list of the meaning of those names.
| Definition | Name |
| AD DS | Active Directory Directory Services |
| AD CS | Active Directory Certificate Services |
| PKI | Public Key Infrastructure |
| DHCP | Dynamic Host Configuration Protocol |
| IKEv2 | Internet Key Exchange Version 2 |
| IP | Internet Protocol |
| UDP | User Datagram Protocol |
| TCP | Transmission Control Protocol |
| RADIUS | Remote Authentication Dial-In User Service |
| VPN | Virtual Private Network |
| HDD | Hard Disk Drive |
| ACL | Access Control List |
| CRL | Certificate Revocation List |
| CDP | CRL Distribution Point |
| AIA | Authority Information Access |
Limitations
For this deployment, it is not a requirement that your infrastructure servers, such as computers running Active Directory Domain Services, Active Directory Certificate Services, and Network Policy Server, are running Windows Server 2016. You can use earlier versions of Windows Server, such as Windows Server 2012 R2, for the infrastructure servers and for the server that is running Remote Access.
Hardware Recommendations
For all servers in this guide the following is a minimum requirement:
- Processor: 1.4Ghz 64-bit processor.
- RAM: 512 MB.
- Disk Space: 32 GB.
- Network: Gigabit (10/100/1000baseT) Ethernet adapter.
- Optical Storage: DVD drive (if installing the OS from DVD media)
Overview
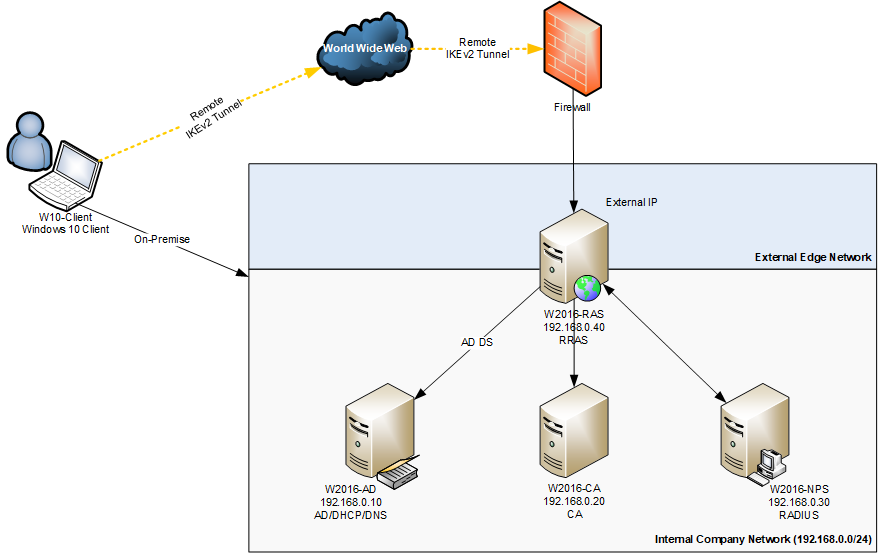
Technical Drawing
Servers
The following is a overview all servers/cllients used in this lab.
| FQDN | IP(s) | Role(s) | Description |
| w2016-dc.constoso.com | 192.168.0.10 | AD DS; DHCP | Domain Controller |
| w2016-ca.constoso.com | 192.168.0.20 | AD CS | Certificate Authority |
| w2016-nps.constoso.com | 192.168.0.30 | NPS | Network Policy Server aka. RADIUS |
| w2016-ras.constoso.com | 192.168.0.40; External IP | RRAS | VPN gateway |
| w10-client.constoso.com | External IP | Client | Device that is connecting to the VPN |
DNS-records
There are also some DNS-records that needs to be established. Here is a short overview of those.
| Record | Type | IP/Alias | Internal/External |
| vpn.contoso.com | A | w2016-ras.constoso.com | External |
| pki.contoso.com | A | 192.168.0.20 | Internal |
TCP/UDP
In this guide, all servers are located in the same subnet, which means there is no firewall between the servers for simplicity. It’s best practice to split the servers into multiple subnets protected by one or more firewall(s). Even though the servers are placed in the same subnet, it’s still required to open the ports in firewall on Windows.
w2016-dc.constoso.com
| Protocol & Port | Usage | Type of traffic |
| TCP and UDP 389 | Directory, Replication, User and Computer Authentication, Group Policy, Trusts | LDAP |
| TCP 636 | Directory, Replication, User and Computer Authentication, Group Policy, Trusts | LDAP SSL |
| TCP 3268 | Directory, Replication, User and Computer Authentication, Group Policy, Trusts | LDAP GC |
| TCP 3269 | Directory, Replication, User and Computer Authentication, Group Policy, Trusts | LDAP GC SSL |
| TCP and UDP 88 | User and Computer Authentication, Forest Level Trusts | Kerberos |
| TCP and UDP 53 | User and Computer Authentication, Name Resolution, Trusts | DNS |
| TCP and UDP 445 | Replication, User and Computer Authentication, Group Policy, Trusts | SMB,CIFS,SMB2, DFSN, LSARPC, NbtSS, NetLogonR, SamR, SrvSvc |
| TCP 25 | Replication | SMTP |
| TCP 135 | Replication | RPC, EPM |
| TCP Dynamic | Replication, User and Computer Authentication, Group Policy, Trusts | RPC, DCOM, EPM, DRSUAPI, NetLogonR, SamR, FRS |
| TCP 5722 | File Replication | RPC, DFSR (SYSVOL) |
| UDP 123 | Windows Time, Trusts | Windows Time |
| TCP and UDP 464 | Replication, User and Computer Authentication, Trusts | Kerberos change/set password |
| UDP Dynamic | Group Policy | DCOM, RPC, EPM |
| UDP 138 | DFS, Group Policy | DFSN, NetLogon, NetBIOS Datagram Service |
| TCP 9389 | AD DS Web Services | SOAP |
| UDP 67 and UDP 2535 | DHCP
DHCP is not a core AD DS service but it is often present in many AD DS deployments. |
DHCP, MADCAP |
| UDP 137 | User and Computer Authentication, | NetLogon, NetBIOS Name Resolution |
| TCP 139 | User and Computer Authentication, Replication | DFSN, NetBIOS Session Service, NetLogon |
w2016-ca.constoso.com
| Protocol & Port | Usage | Type of traffic |
| TCP/4000 | Certificate Enrolling | RPC |
| TCP/80 | AIA & CDP | HTTP |
w2016-nps.constoso.com
| Protocol & Port | Usage | Type of traffic |
| UDP 1645 | authentication and authorization | RADIUS |
| UDP 1646 | accounting | RADIUS |
| UDP 1812 | authentication and authorization | RADIUS |
| UDP 1813 | accounting | RADIUS |
w2016-ras.constoso.com
| Protocol & Port | Usage | Type of traffic |
| UDP 500 | IKEv2 | VPN |
| UDP 4500 | IKEv2 | VPN |
Accounts and Keys
Groups
We are also going to create som Active Directory groups.
| Group Scope | Group Type | samAccountName | Description |
| Global | Security | Contoso\sec-server-nps | Group that contains all NPS computer objects. |
| Global | Security | Contoso\sec-server-vpn | Group that contains all VPN (RRAS) computer objects. |
| Global | Security | Contoso\sec-vpn-users | Members in this group are allowed to use the VPN connection. |
Users
Here is an overview of users, their password and usage.
| Username | Password | Description |
| Administrator | Pa$$w0rd | Local Administrator |
| Contoso\Administrator | Pa$$w0rd | Contoso Domain Administrator |
| Contoso\su-dhcp-update | Pa$$w0rd | DHCP/DNS dynamic update service account |
Keys
We are also going to use some shared secrets.
| Key | Description |
| a7wr8urQKbmwD27m | Directory Services Restore Mode (DSRM) |
| 4hG9sBtW9hL2GGSE | RADIUS Shared Secret for w2016-ras.contoso.com |
Configuration
We are now going to configure all servers from scratch, let’s get started!
w2016-dc.constoso.com
This server is running Active Directory, DNS and the DHCP role. Use the following instructions to setup a new AD forest, DNS and the DHCP server.
Prerequisites
Before proceeding with the configuration, the domain controller needs to have a static IP address with a DNS pointing to itself.
- Open a PowerShell terminal with privileged permissions (run as administrator).
- Execute the following, which will rename the server, set a static IP with a static DNS and restart afterwards.
12345678910111213#Rename the server.Rename-Computer -NewName W2016-DC -Restart $false;#Static IP and DNS.$IP = "192.168.0.10"$DNS = "127.0.0.1"#Set static IP with DNS.New-NetIPAddress -InterfaceAlias Ethernet -IPAddress $IP -AddressFamily IPv4 -PrefixLength 24;Set-DnsClientServerAddress -InterfaceAlias Ethernet -ServerAddresses $DNS;#Restart the server.Restart-Computer -Force;
- Open in the firewall to allow traffic to the server.
1234New-NetFirewallRule -DisplayName "DHCP (TCP) - Inbound" -Direction Inbound -LocalPort 67 -Protocol TCP -Action Allow;New-NetFirewallRule -DisplayName "DHCP (UDP) - Inbound" -Direction Inbound -LocalPort 67 -Protocol UDP -Action Allow;New-NetFirewallRule -DisplayName "MADCAP (TCP) - Inbound" -Direction Inbound -LocalPort 2535 -Protocol TCP -Action Allow;New-NetFirewallRule -DisplayName "MADCAP (UDP) - Inbound" -Direction Inbound -LocalPort 2535 -Protocol UDP -Action Allow;
AD DS
The following will install the Windows Server role Active Directory Domain Services.
- Open a PowerShell terminal with privileged permissions (run as administrator).
- Execute the following.
1Install-WindowsFeature AD-Domain-Services -IncludeManagementTools -Confirm:$false; - The following will create an Active Directory with “contoso.com” as the domain name and “Contoso” as the NETBIOS name. The server will restart automatically, during configuration.
123456#Directory Services Restore Mode (DSRM).$DSRM = ("a7wr8urQKbmwD27m" | ConvertTo-SecureString -AsPlainText -Force)#Install an Active Directory forest.Import-Module ADDSDeployment;Install-ADDSForest -DomainName "contoso.com" -DomainNetbiosName "Contoso" -NoDnsOnNetwork -InstallDNS -SafeModeAdministratorPassword $DSRM -Confirm:$false; - When the server have restarted, login with the domain administrator credentials.
Users and Groups
The following script, will create all necessary users and groups in Active Directory.
- We need to create some groups and add members to them. Note that all servers and workstations needs to be joined the domain before the following code will work.
12345678910#Add new group(s).New-ADGroup -GroupCategory Security -GroupScope Global -Name "sec-server-nps";New-ADGroup -GroupCategory Security -GroupScope Global -Name "sec-server-vpn";New-ADGroup -GroupCategory Security -GroupScope Global -Name "sec-vpn-users";#Add members to group.Add-ADGroupMember -Identity "sec-server-nps" -Members "w2016-nps$";Add-ADGroupMember -Identity "sec-server-vpn" -Members "w2016-ras$";Add-ADGroupMember -Identity "sec-vpn-users" -Members "Domain Users";Add-ADGroupMember -Identity "sec-vpn-users" -Members "Domain Computers";
DHCP
The following will install the Windows Server role DHCP.
- Open a PowerShell terminal with privileged permissions (run as administrator).
- Execute the following, which will install the DHCP role.
12Add-WindowsFeature -IncludeManagementTools DHCP -Confirm:$false;Set-ItemProperty –Path registry::HKEY_LOCAL_MACHINE\SOFTWARE\Microsoft\ServerManager\Roles\12 –Name ConfigurationState –Value 2;
- Now we need to create the security groups “DHCP Administrators” and “DHCP Users” on the local DHCP server. Open a command prompt with privileged permissions (run as administrator) and execute the following.
1netsh dhcp add securitygroups
- Now go back to the PowerShell terminal and run the following, which will restart the DHCP service.
1Restart-Service DHCPServer;
- Now we need to allow the DHCP to update A and PTR records. Run the following in the PowerShell terminal.
1Set-DhcpServerv4DnsSetting -ComputerName "W2016-DC.contoso.com" -DynamicUpdates "Always" -DeleteDnsRRonLeaseExpiry $True;
- Now we need to create an Active Directory the DHCP server uses to register or unregister client records on the DNS server.
12345#AD user password.$Password = 'Pa$$w0rd' | ConvertTo-SecureString -AsPlainText -Force;#Create the new user.New-ADUser -Name "su-dhcp-update" -SamAccountName "su-dhcp-update" -UserPrincipalName "su-dhcp-update@contoso.com" -AccountPassword $Password -Confirm:$false -Enabled $true;
- Use the following command to configure the credentials that the DHCP server uses to register or unregister client records on a DNS server.
1234567#Credentials.$Username = "Contoso\su-dhcp-update";$Password = 'Pa$$w0rd' | ConvertTo-SecureString -AsPlainText -Force;$Credential = New-Object -TypeName System.Management.Automation.PSCredential -ArgumentList $Username, $Password;#Set DNS credential.Set-DhcpServerDnsCredential -Credential $Credential -ComputerName "W2016-DC.contoso.com";
- Now we need to authorize the DHCP server in Active Directoy, run the following in a PowerShell terminal.
12#Authorize the DHCP server in AD.Add-DhcpServerInDC -DnsName "W2016-DC.contoso.com" -IPAddress "192.168.0.10";
- The following will create a new DHCP scope and set the scope options.
12345#Add a new DHCP scope.Add-DhcpServerv4Scope -name "Clients" -StartRange "192.168.0.100" -EndRange "192.168.0.200" -SubnetMask 255.255.255.0 -State Active;#Set DHCP scope options.Set-DhcpServerv4OptionValue -ComputerName "W2016-DC.contoso.com" -ScopeId 192.168.0.0 -DnsServer 192.168.0.10 -DnsDomain "contoso.com";
DNS
This will configure the DNS server.
- We need to add some records to get the environment working. Run the following in a PowerShell terminal.
1Add-DnsServerResourceRecordA -Name "pki" -ZoneName "contoso.com" -IPv4Address "192.168.0.20";
w2016-ca.contoso.com
Prerequisites
Before proceeding with the configuration, the certificate needs to have a static IP address with a DNS pointing to the primary DNS server.
- Open a PowerShell terminal with privileged permissions (run as administrator).
- Execute the following, which will rename the server, set a static IP with a static DNS and restart afterwards.
12345678910111213#Rename the server.Rename-Computer -NewName W2016-CA;#Static IP and DNS.$IP = "192.168.0.20"$DNS = "192.168.0.10"#Set static IP with DNS.New-NetIPAddress -InterfaceAlias Ethernet -IPAddress $IP -AddressFamily IPv4 -PrefixLength 24;Set-DnsClientServerAddress -InterfaceAlias Ethernet -ServerAddresses $DNS;#Restart the server.Restart-Computer -Force;
- Now we need to join the Contoso AD domain. Run the following in a PowerShell terminal with elevated permissions. The server will restart.
1234567#Credentials.$Username = "Contoso\Administrator";$Password = 'Pa$$w0rd' | ConvertTo-SecureString -AsPlainText -Force;$Credential = New-Object -TypeName System.Management.Automation.PSCredential -ArgumentList $Username, $Password;#Join the server to the domain.Add-Computer -DomainName "contoso.com" -Credential $Credential -Restart;
- The loopback check security feature is designed to help prevent reflection attacks on your computer. Therefore, authentication fails if the FQDN or the custom host header that you use does not match the local computer name. Run in an elevated PowerShell terminal.
1New-ItemProperty HKLM:\System\CurrentControlSet\Control\Lsa -Name "DisableLoopbackCheck" -Value "1" -PropertyType dword;
- Open the Windows firewall to allow traffic to the server.
1234New-NetFirewallRule -DisplayName "HTTP (TCP) - Inbound" -Direction Inbound -LocalPort 80 -Protocol TCP -Action Allow;New-NetFirewallRule -DisplayName "HTTPS (TCP) - Inbound" -Direction Inbound -LocalPort 443 -Protocol TCP -Action Allow;New-NetFirewallRule -DisplayName "CA (TCP) - Inbound" -Direction Inbound -LocalPort 4000 -Protocol TCP -Action Allow;New-NetFirewallRule -DisplayName "CA (UDP) - Inbound" -Direction Inbound -LocalPort 4000 -Protocol UDP -Action Allow;
AD CS
The following will install the Windows Server role Active Directory Certificate Services.
- Open a PowerShell terminal with privileged permissions (run as administrator).
- Execute the following, which will install the certificate authority role.
1Install-WindowsFeature Adcs-cert-Authority -IncludeManagementTools;
- Now we need to configure the certificate authority, use the following in a PowerShell terminal.
1234567891011Install-AdcsCertificationAuthority -CAType EnterpriseRootCa `-CACommonName "Contoso-CA" `-CADistinguishedNameSuffix "O=Contoso,C=US" `-KeyLength 2048 `-HashAlgorithmName SHA256 `-CryptoProviderName "RSA#Microsoft Software Key Storage Provider" `-DatabaseDirectory "C:\Windows\system32\CertLog" `-LogDirectory "C:\Windows\system32\CertLog" `-ValidityPeriod Years `-ValidityPeriodUnits 5 `-Confirm:$false;
- Now we need to add some additional roles on the certificate authority for allowing clients to perform tasks such as request and renew certificates, retrieve certificate revocation lists (CRLs) and enroll certificates. Run the following in a PowerShell terminal. This might take some time to finish.
1Add-WindowsFeature ADCS-Enroll-Web-Pol,ADCS-Enroll-Web-Svc,ADCS-Web-Enrollment,Web-Server,Web-WebServer,Web-Common-Http,Web-Default-Doc,Web-Dir-Browsing,Web-Http-Errors,Web-Static-Content,Web-Http-Redirect,Web-Health,Web-Http-Logging,Web-Log-Libraries,Web-Request-Monitor,Web-Http-Tracing,Web-Performance,Web-Stat-Compression,Web-Security,Web-Filtering,Web-Client-Auth,Web-Cert-Auth,Web-Windows-Auth,Web-App-Dev,Web-Net-Ext45,Web-ASP,Web-Asp-Net45,Web-ISAPI-Ext,Web-ISAPI-Filter,Web-Mgmt-Tools,Web-Mgmt-Console,Web-Mgmt-Compat,Web-Metabase,Web-Scripting-Tools,NET-Framework-45-ASPNET,NET-WCF-Services45,NET-WCF-HTTP-Activation45,NET-WCF-TCP-PortSharing45;
- To configure the “Certification Authority Web Enrollment” run the following, this will build the virtual applications under the “Default Web Site“.
1Install-AdcsWebEnrollment -Confirm:$false;
- We now need to create a new website called “pki.contoso.com” for CDP and AIA. Run the following in an elevated PowerShell terminal.
12345#Create a new directory for the website.New-Item -Path "C:\inetpub\wwwroot\pki.contoso.com\pki" -ItemType Directory -Force;#Create the new website.New-WebSite -Name "pki.contoso.com" -Port 80 -HostHeader "pki.contoso.com" -PhysicalPath "C:\inetpub\wwwroot\pki.contoso.com";
- We now need to enable double escape quoting on the newly created website. Run the following in command prompt.
12cd "C:\Windows\System32\inetsrv"Appcmd set config "pki.contoso.com" /section:system.webServer/Security/requestFiltering -allowDoubleEscaping:True
- Configure the CA to support audit filters. Run the following in an elevated command prompt.
1certutil -setreg CA\AuditFilter 127
- Normally when you start a Windows CA server it allocates a random high port number for the service to listen on. When clients want to enroll certificates they find this dynamic port number by asking the CA Server’s RPC Endpoint mapper that always listens on port 135.Therefor we will set a static port to make it easier establishing the firewall rules. This needs done on every certificate authority server. The certificate authority role needs to be installed before it’s possible to make it static. Open “%windir%\system32\comexp.msc” as “Run as Administrator”.
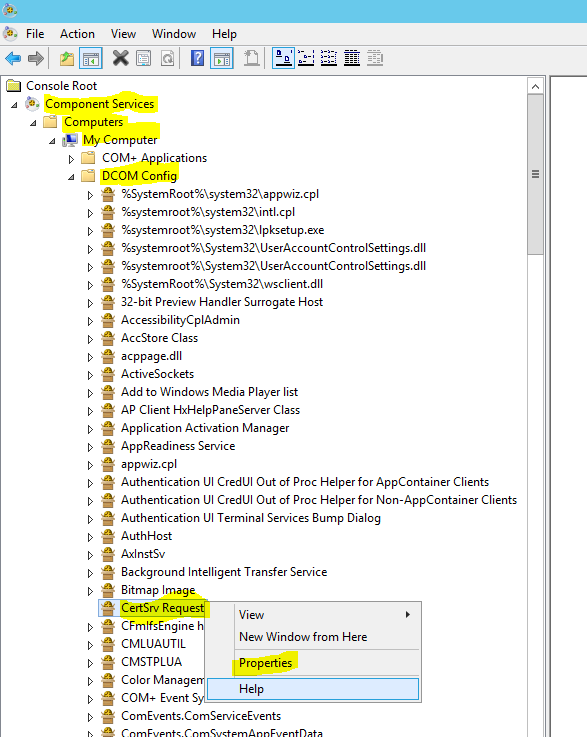
- Then browse to “Component Services”, “Computers”, “My Computer”, “DCOM Config” and then find “CertSrv Request” right click and select “Properties”.
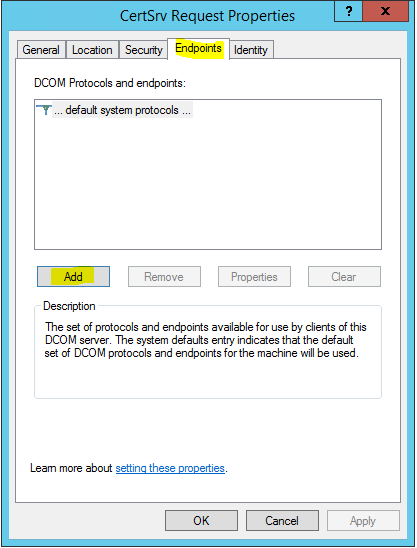
- Click on the “Endpoints”-tab and click on “Add”.
- Checkmark “Use static endpoint”, and write “4000” in the port text field. Click “OK” two times.

- Now open a command prompt terminal with “Run as Administrator”. Execute the following.
12net stop certsvcnet start certsvc
- In the same CMD terminal, execute the following.
1regedit
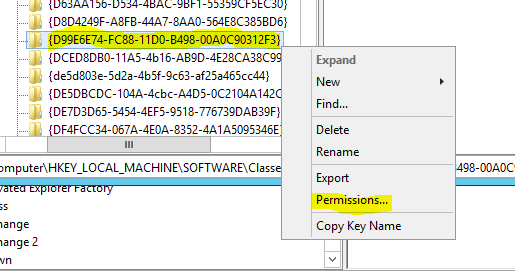
- Go the following key “HKEY_LOCAL_MACHINE\SOFTWARE\Classes\AppID\{D99E6E74-FC88-11D0-B498-00A0C90312F3}”.
- Right click the key “{D99E6E74-FC88-11D0-B498-00A0C90312F3}”, and choose “Permission”.
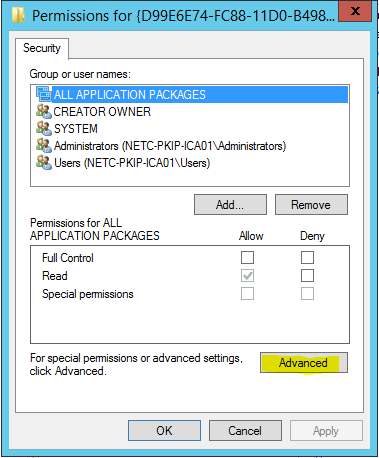
- Click on “Advanced”.
- Now click on “Change” in the “Owner”-area.

- Add the “[NETBIOS]\Administrators” (replace NETBIOS with the local machine name). Click “OK”.
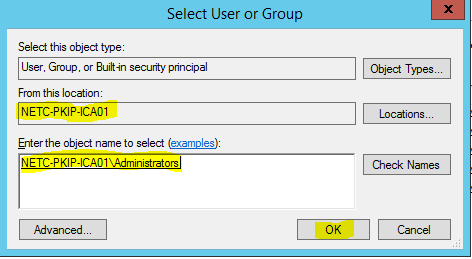
- Click “OK” again.
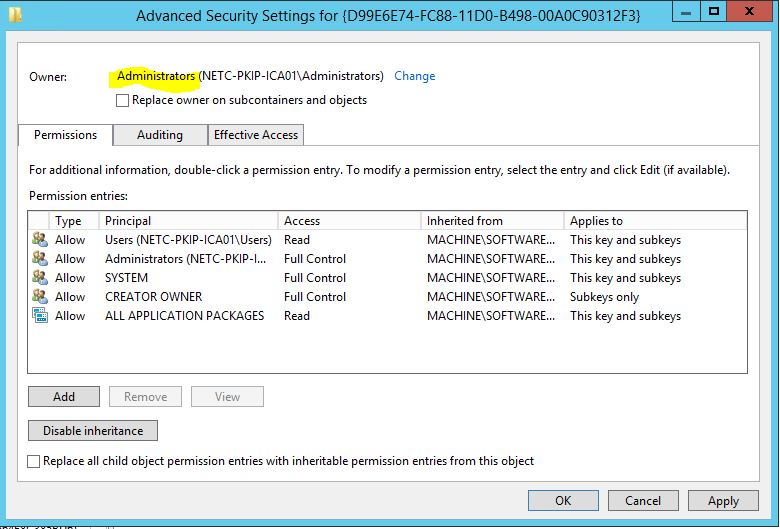
- Now we disable RPC for the interface ICertPassage. In an elevated command prompt, run the following command.
1certutil -setreg ca\interfaceflags +0x8
- In the same terminal execute the following. Now we have changed it to a static port, but the CA Server will not change listening ports until a new certificate request comes in.
12net stop certsvcnet start certsvc
- Now copy the certificate and revocation file to the newly created website for the CDP and AIA. Run the following in a command prompt, and choose “d” when it prompt you for a file or directory.
1xcopy "C:\Windows\System32\CertSrv\CertEnroll\*" "C:\inetpub\wwwroot\pki.contoso.com\pki" /s /d /z
- Configure the CDPs, run the following in PowerShell.
1234567891011121314151617181920#Get all CDPs.$CRLList = Get-CACrlDistributionPoint;#Foreach each CDP.Foreach ($CRL in $CRLList){Remove-CACrlDistributionPoint $CRL.uri -Force;}#Restart the CA service.net stop certsvcnet start certsvc#Add CDPs.Add-CACRLDistributionPoint -Uri C:\Windows\System32\CertSrv\CertEnroll\%3%8%9.crl -PublishToServer -PublishDeltaToServer -Force;Add-CACRLDistributionPoint -Uri "http://pki.contoso.com/pki/%3%8%9.crl" -AddToCertificateCDP -Force;#Restart the CA service.net stop certsvcnet start certsvc
- Finally publish the latest certificates and CRLs and copy them to the CDP/AIA. Run the following in a command prompt.
1234certutil -crlxcopy "C:\Windows\System32\CertSrv\CertEnroll\*" "C:\inetpub\wwwroot\pki.contoso.com\pki" /s /d /znet stop certsvcnet start certsvc
Group Policy
Certificate Autoenrollment
In this procedure, you configure Group Policy on the domain controller so that domain members automatically request user and computer certificates. Doing so allows VPN users to request and retrieve user certificates that authenticate VPN connections automatically. Likewise, this policy allows NPS servers to request server authentication certificates automatically.
- Logon on the domain controller, and open “%SystemRoot%\system32\gpmc.msc”.
- Navigate to “Forest: constoso.com” à “Domains” à “com”. Right click on the domain and choose “Create a GPO in this domain, and Link it here”.
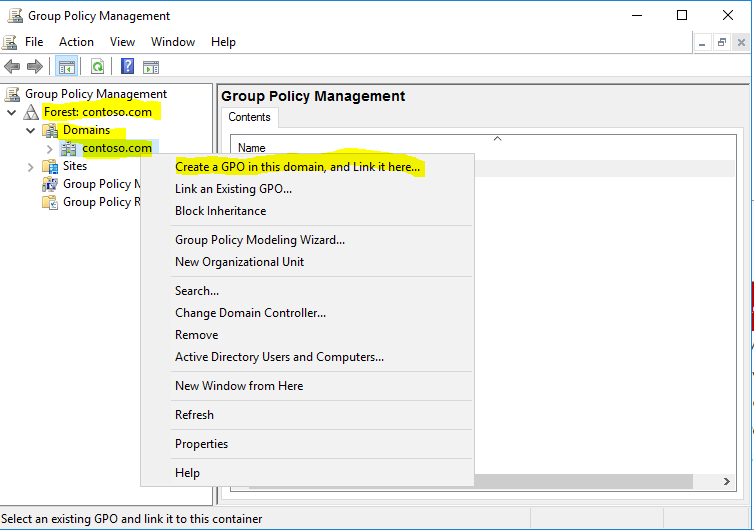
- In the name of the GPO type “Autoenrollment Policy”, click “OK”.
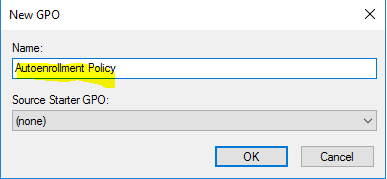
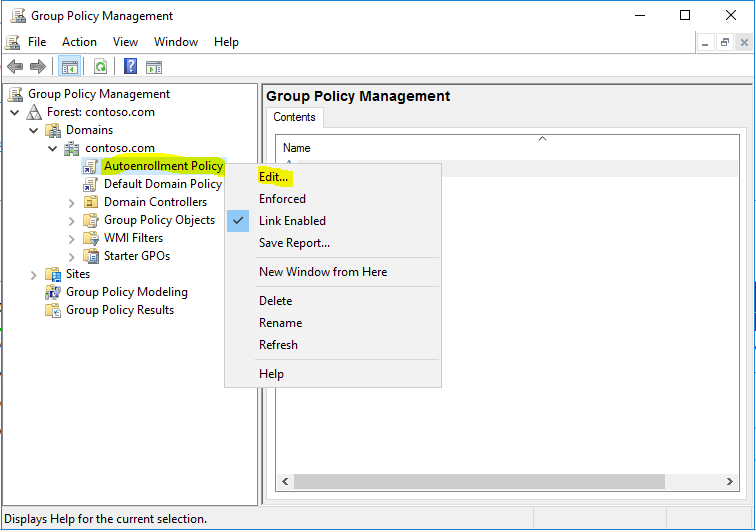
- In the navigation pane, right-click “Autoenrollment Policy“, and click “Edit“.
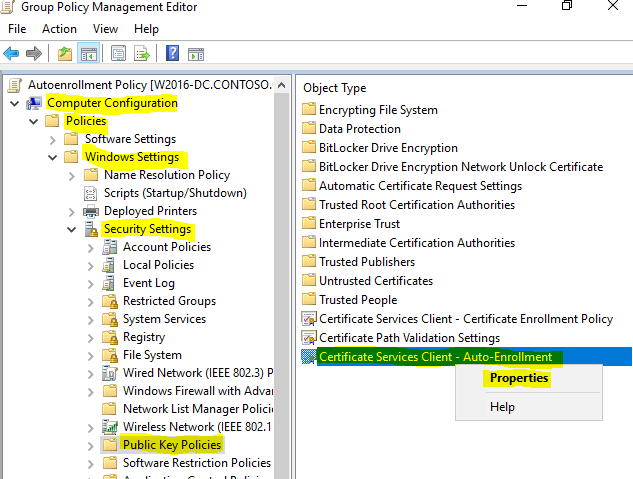
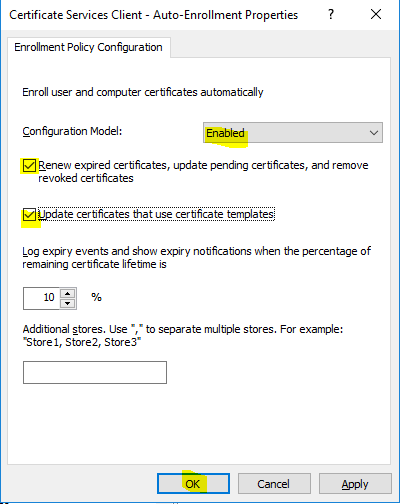
- Navigate to “Computer Configuration\Policies\Windows Settings\Security Settings\Public Key Policies”, right click on “Certificate Services Client – Auto-Enrollment” and select “Properties”.
- In “Configuration Model” choose “Enabled”, then select the following, and click “OK”.
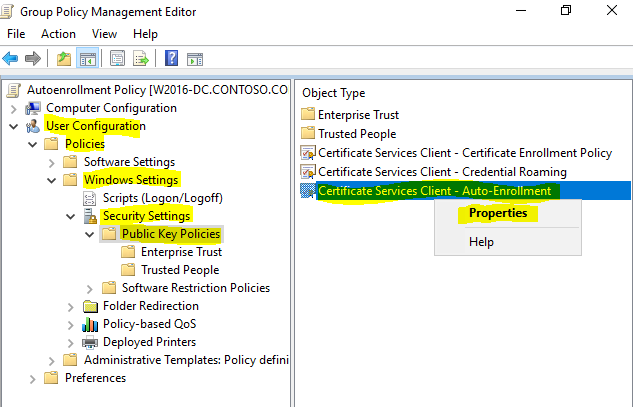
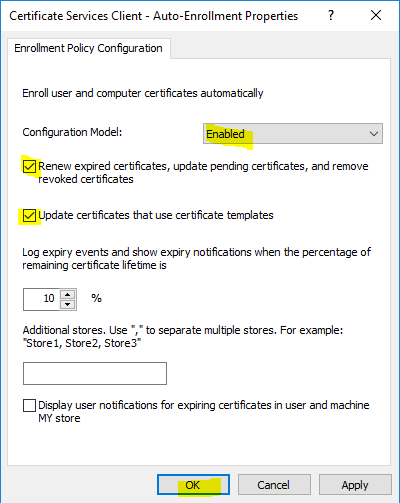
- In the same policy navigate to “User Configuration\Policies\Windows Settings\Security Settings\Public Key Policies”, right click on “Certificate Services Client – Auto-Enrollment” and choose “Properties”.
- In “Configuration Model” choose “Enabled”, then select the following, and click “OK”.
Certificate Templates
In the following section we will configure certificates templates to distribute to servers and clients.
VPN Server Authentication
Before we can create a network policy, we need to be able to enroll an “RAS and IAS Server” certificate to the VPN server. Execute the following on the certificate authority “w2016-ca.contoso.com”.
- Open “%SystemRoot%\system32\certsrv.msc”.
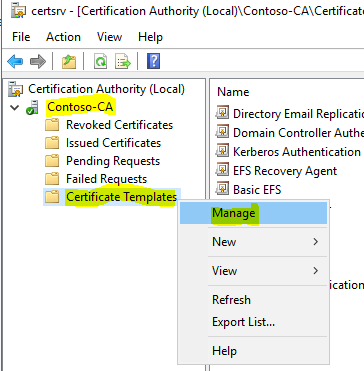
- Navigate to “Certification Authority (Local)”, “Contoso-CA”, then right click on “Certificate Templates” and click “Manage”, this will open a new window.
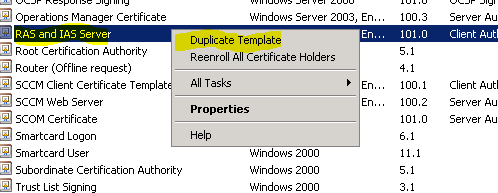
- In the new window find “RAS and IAS Server”, right click and select “Duplicate Template”.
- Now choose “Windows Server 2003” in the “Compatibility” tab.

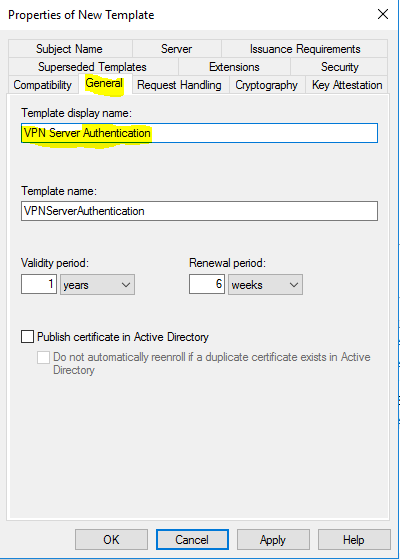
- On the “General” tab in “Template display name” write “NPS Server Authentication”.
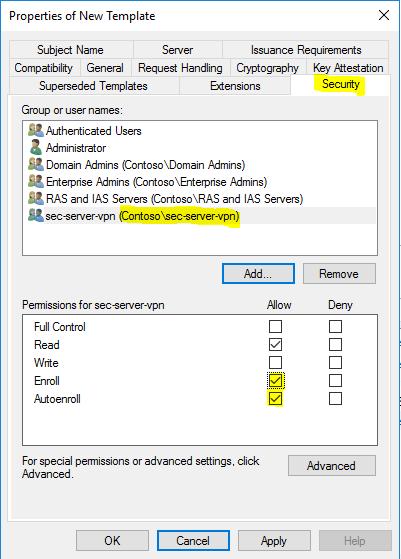
- Now in the “Security” tab, add the NPS server group “Contoso\sec-server-vpn”, and checkmark “Enroll” and “Autoenroll” (autoenroll is not required in this example) to “Allow”. Click “OK”.
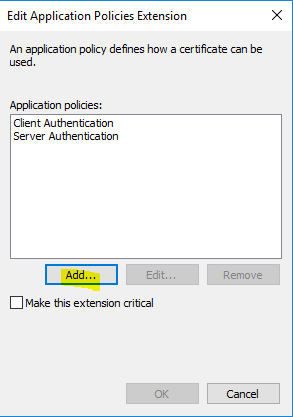
- On the “Extensions” tab, click on “Application Policies” and then “Edit”.
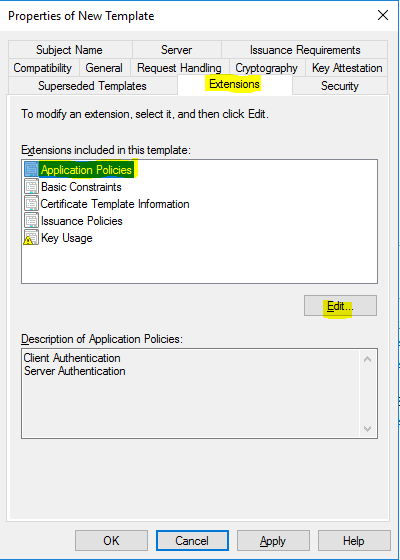
- Click on “Add”.
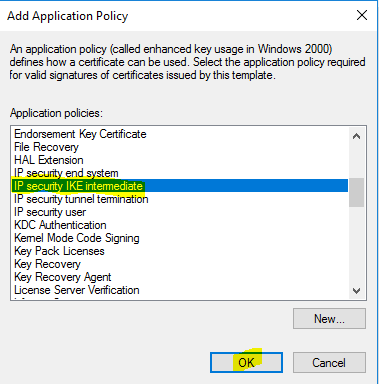
- Find “IP security IKE intermediate”, and click “OK”. Adding IP security IKE intermediate to the EKU helps in scenarios where more than one server authentication certificate exists on the VPN server. When IP security IKE intermediate is present, IPSec only uses the certificate with both EKU options.
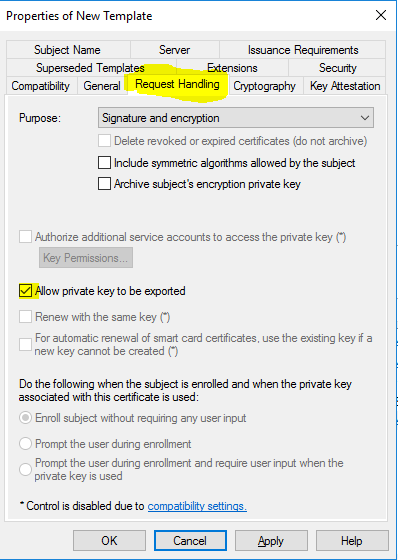
- On the “Request Handling” tab, checkmark “Allow private key to be exported”.
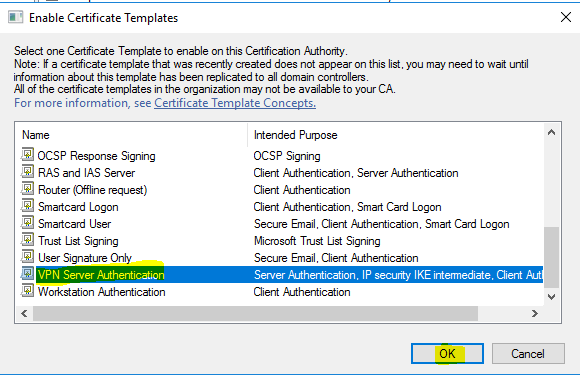
- Now go back to “%SystemRoot%\system32\certsrv.msc”, right click on “Certificate Templates”, and choose “New” and then “Certificate Template to Issue”.

- Select “VPN Server Authentication” and click “OK”.
NPS Server Authentication
This template to create is the NPS Server Authentication template. The NPS Server Authentication template is a simple copy of the RAS and IAS Server template secured to the NPS Server group.
- Open “%SystemRoot%\system32\certsrv.msc”.
- Navigate to “Certification Authority (Local)”, “Contoso-CA”, then right click on “Certificate Templates” and click “Manage”, this will open a new window.

- In the new window find “RAS and IAS Server”, right click and select “Duplicate Template”.

- Now choose “Windows Server 2003” in the “Compatibility” tab.

- In the “Template display name” write “NPS Server Authentication” on the “General” tab.

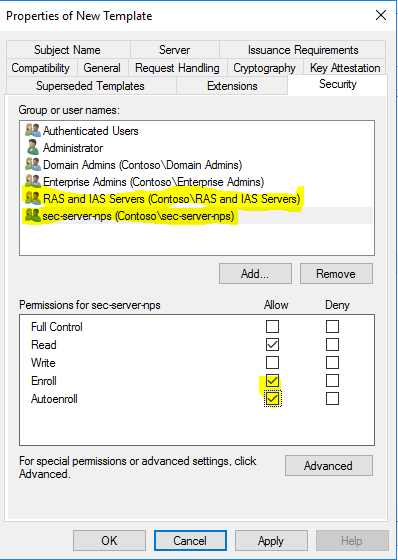
- On the “Security” tab, add the group “Contoso\sec-server-nps” with the NPS servers, and checkmark “Enroll” and “Autoenroll”. Remove the group “Contoso\RAS and IAS Servers”. Click “OK”.
- Now go back to “%SystemRoot%\system32\certsrv.msc”, right click on “Certificate Templates”, and choose “New” and then “Certificate Template to Issue”.

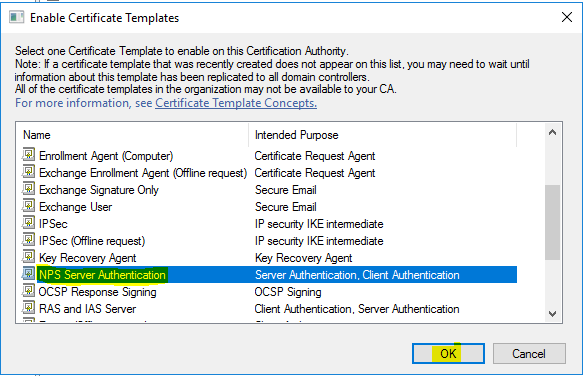
- Select “NPS Server Authentication” and click “OK”.
User Authentication
In this procedure, you configure a custom client-server authentication template. This template is required because you want to improve the certificate’s overall security by selecting upgraded compatibility levels and choosing the Microsoft Platform Crypto Provider. This last change lets you use the TPM on the client computers to secure the certificate.
- Open “%SystemRoot%\system32\certsrv.msc”.
- Navigate to “Certification Authority (Local)”, “Contoso-CA”, then right click on “Certificate Templates” and click “Manage”, this will open a new window.

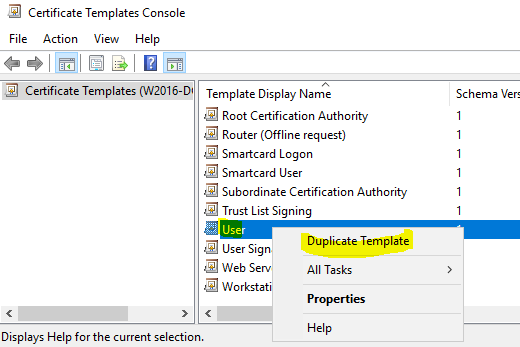
- In the new window find “User”, right click and select “Duplicate Template”.
- In the “General” tab, write “VPN User Authentication” in the “Template display name” text field, and then clear “Publish certificate in Active Directory”.

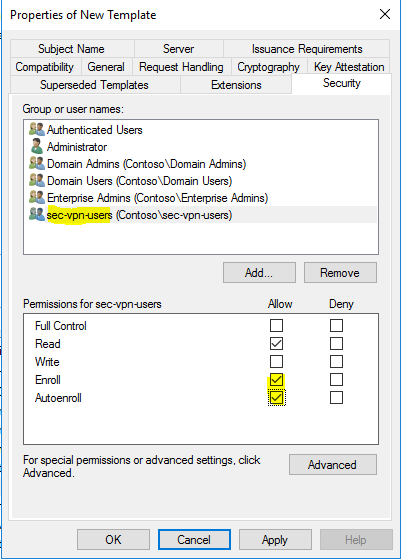
- On the “Security” tab, add the group “sec-vpn-users”, then checkmark “Enroll” and “Autoenroll”.
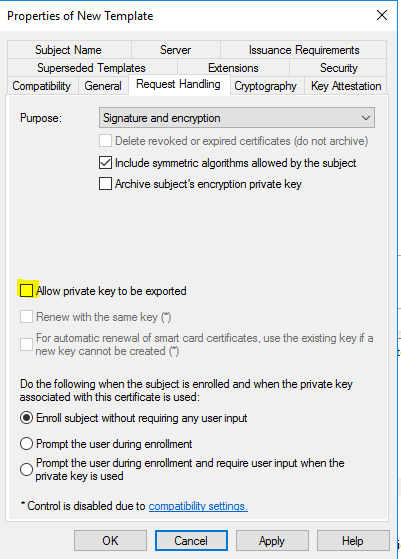
- On the “Request Handling” tab, clear the “Allow private key to be exported” check box.
- On the “Compatibility” tab, in the “Certification Authority” dropdown choose “Windows Server 2012 R2”, and in “Certificate recipient” choose “Windows 8.1 / Windows Server 2012 R2”.

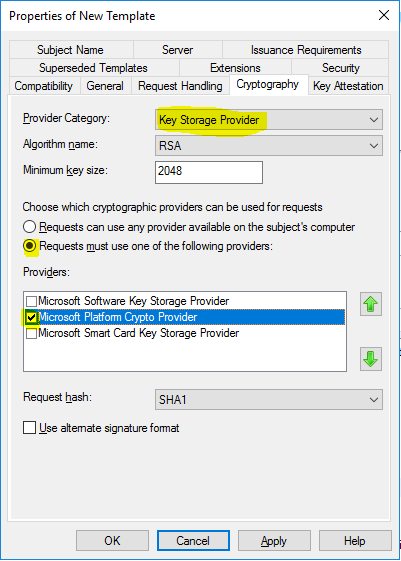
- On the “Cryptography” in “Provider Category“, choose “Key Storage Provider” and check “Requests must use one of the following providers” and checkmark “Microsoft Platform Crypto Provider”. If you are on a virtual machine, you also need to allow “Microsoft Software Key Storage Provider“.
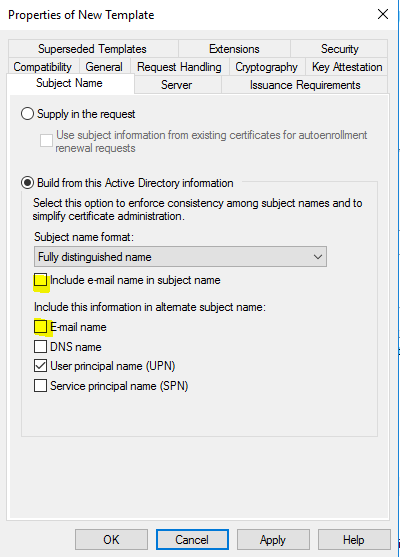
- In the “Subject Name” tab, clear “Include e-mail name in subject name” and “E-mail name”. Then click “OK”.
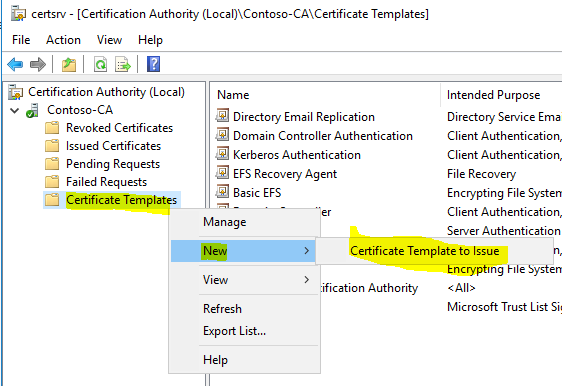
- Now go back to “%SystemRoot%\system32\certsrv.msc”, right click on “Certificate Templates”, and choose “New” and then “Certificate Template to Issue”.
- Choose “VPN User Authentication”, click “OK”.

Device Authentication
This certificate will be enrolled to the workstation, and allows the client to make a device VPN tunnel.
- Open “%SystemRoot%\system32\certsrv.msc”.
- Navigate to “Certification Authority (Local)”, “Contoso-CA”, then right click on “Certificate Templates” and click “Manage”, this will open a new window.

- In the new window find “Workstation Authentication”, right click and select “Duplicate Template”.
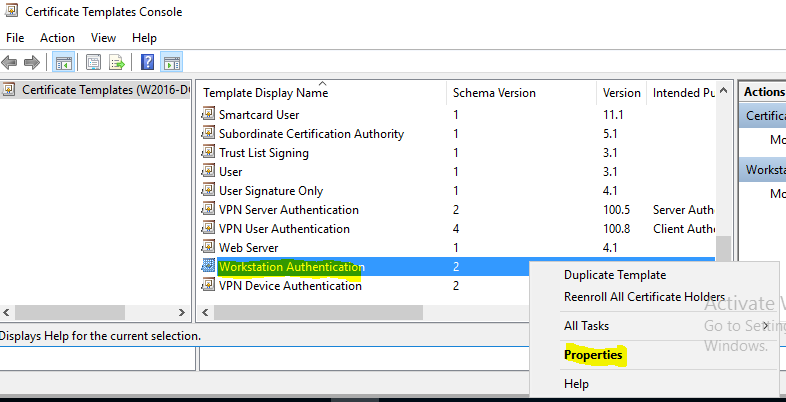
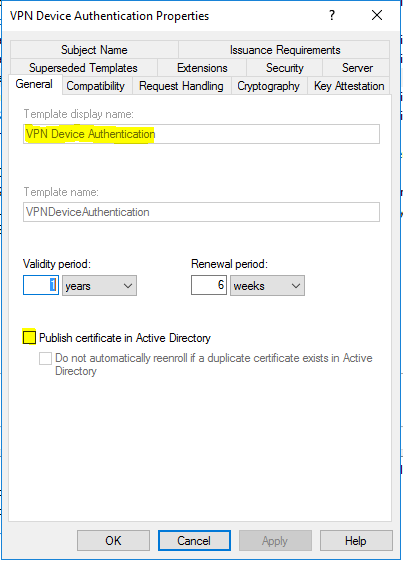
- In the “General” tab, write “VPN Device Authentication” in the “Template display name” text field, and then clear “Publish certificate in Active Directory”.
- On the “Security” tab, add the group “Domain Computers”, then checkmark “Read”, “Enroll” and “Autoenroll”. Click “OK” twice.

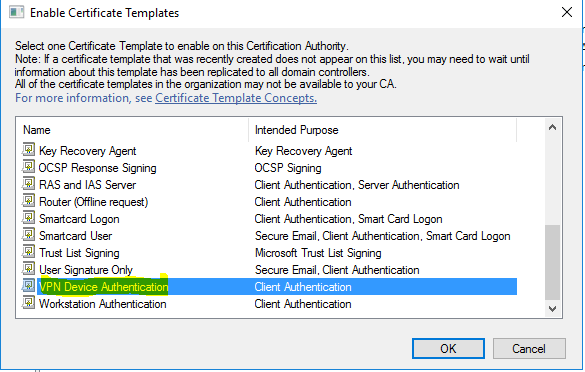
- Now go back to “%SystemRoot%\system32\certsrv.msc”, right click on “Certificate Templates”, and choose “New” and then “Certificate Template to Issue”.

- Choose “VPN Device Authentication”, click “OK”.
w2016-nps.contoso.com
The following procedure will configure the RADIUS server to authenticate users and devices trying to establish connection through VPN.
Prerequisites
Before proceeding with the configuration, the network policy server (RADIUS) needs to have a static IP address with a DNS pointing to the primary DNS server, and should be joined the Contoso domain.
- Open a PowerShell terminal with privileged permissions (run as administrator).
- Execute the following, which will rename the server, set a static IP with a static DNS and restart afterwards.
12345678910111213#Rename the server.Rename-Computer -NewName W2016-NPS;#Static IP and DNS.$IP = "192.168.0.30"$DNS = "192.168.0.10"#Set static IP with DNS.New-NetIPAddress -InterfaceAlias Ethernet -IPAddress $IP -AddressFamily IPv4 -PrefixLength 24;Set-DnsClientServerAddress -InterfaceAlias Ethernet -ServerAddresses $DNS;#Restart the server.Restart-Computer -Force;
- Now we need to join the Contoso AD domain. Run the following in a PowerShell terminal with elevated permissions. The server will restart.
1234567#Credentials.$Username = "Contoso\Administrator";$Password = 'Pa$$w0rd' | ConvertTo-SecureString -AsPlainText -Force;$Credential = New-Object -TypeName System.Management.Automation.PSCredential -ArgumentList $Username, $Password;#Join the server to the domain.Add-Computer -DomainName "contoso.com" -Credential $Credential -Restart;
- Open the Windows firewall to allow traffic to the server.
1234New-NetFirewallRule -DisplayName "RADIUS 1645 (UDP) - Inbound" -Direction Inbound -LocalPort 1645 -Protocol UDP -Action Allow;New-NetFirewallRule -DisplayName "RADIUS 1646 (UDP) - Inbound" -Direction Inbound -LocalPort 1646 -Protocol UDP -Action Allow;New-NetFirewallRule -DisplayName "RADIUS 1812 (UDP) - Inbound" -Direction Inbound -LocalPort 1812 -Protocol UDP -Action Allow;New-NetFirewallRule -DisplayName "RADIUS 1813 (UDP) - Inbound" -Direction Inbound -LocalPort 1813 -Protocol UDP -Action Allow;
NPS
The following will install and setup the network policy server (NPS) also known as a RADIUS server.
- Open a PowerShell terminal with privileged permissions (run as administrator).
- Execute the following which will install the NPS.
1Install-WindowsFeature NPAS -IncludeManagementTools;
- Register the NPS server in Active Directory. Run the following in an elevated command prompt.
1netsh nps add registeredserver
- We need to add the “w2016-ras.contoso.com” as a RADIUS client. Run the following in a PowerShell terminal with elevated permissions.
1New-NpsRadiusClient -Address "192.168.0.40" -Name "W2016-RAS" -SharedSecret "4hG9sBtW9hL2GGSE";
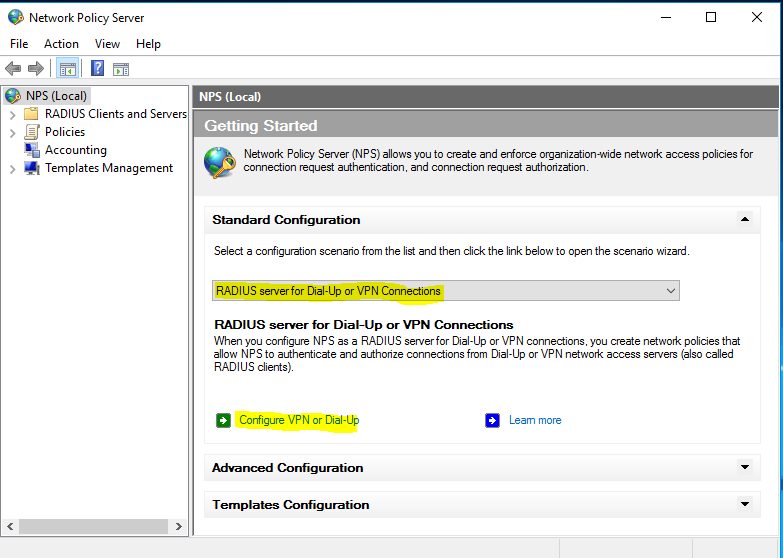
- Open “%windir%\system32\nps.msc”.
- Choose “RADIUS server for Dial-up or VPN Connections” and click “Configure VPN or Dial-up”.
- Choose “Virtual Private Network (VPN) Connections” and click “Next”.
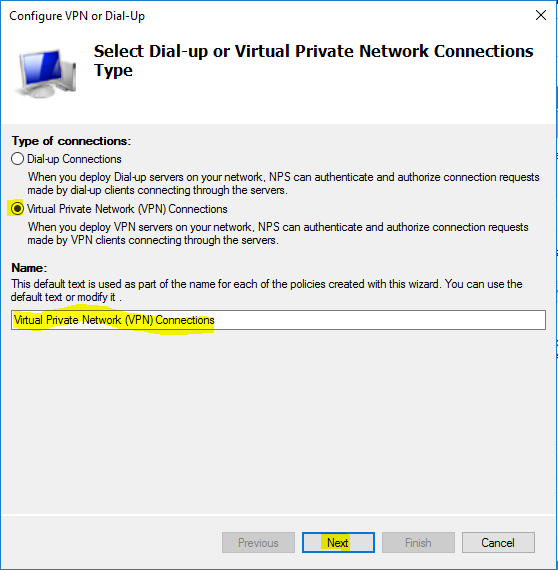
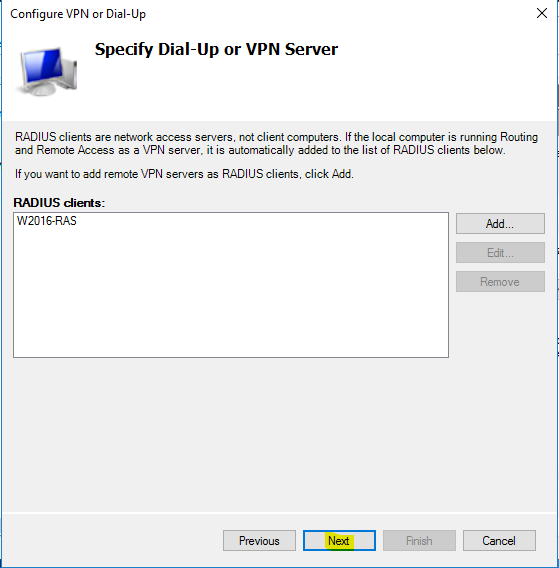
- Click “Next” again.
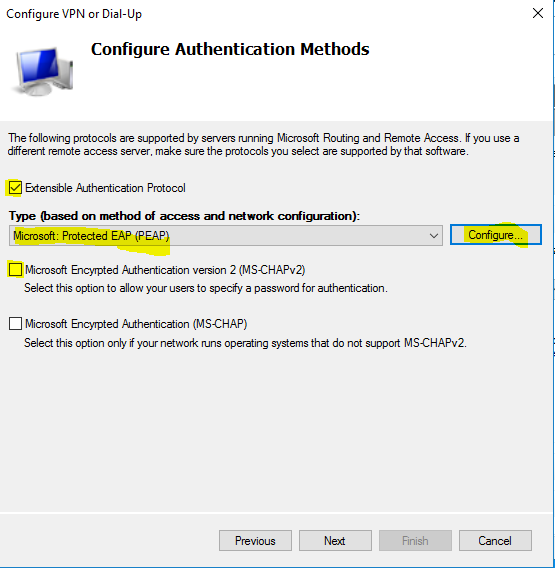
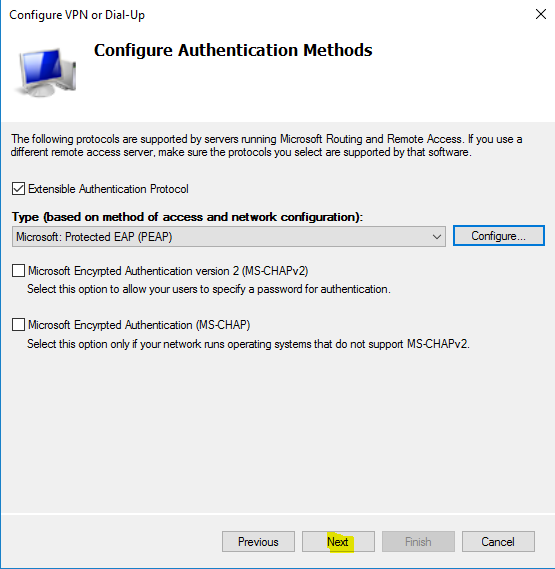
- Clear the “Microsoft Encrypted Authentication version 2 (MS-CHAPv2)” checkbox, and checkmark “Extensible Authentication Protocol” and in the dropdown choose “Microsoft: Protected EAP (PEAP)”. Click on “Configure”.
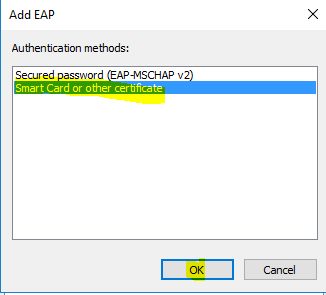
- Select “Secured password (EAP-MSCHAP v2)” and click “Remove”.

- Now click “Add”.
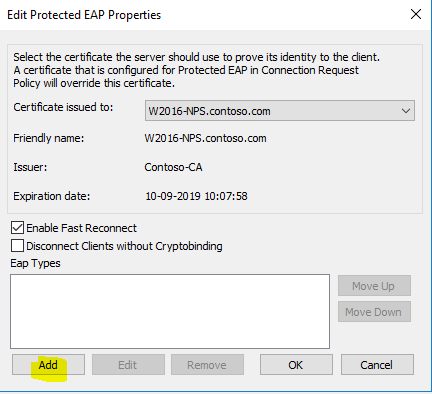
- Highlight “Smart Card or other certificate” and click “OK” twice.
- Now click “Next”.
- Now add “sec-vpn-users”, click “Next” three times.

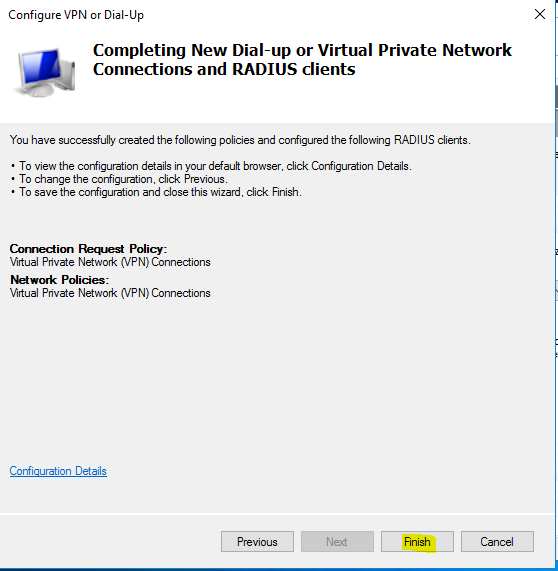
- Click “Finish”.
w2016-ras.contoso.com
This server is running the RRAS role. Use the following instructions to setup Remote Access as a RAS Gateway VPN Server.
RRAS is designed to perform well as both a router and a remote access server because it supports a wide array of features. For the purposes of this deployment, you require only a small subset of these features: support for IKEv2 VPN connections and LAN routing.
It is important to:
- Install two Ethernet network adapters in the physical server. If you are installing the VPN server on a VM, you must create two External virtual switches, one for each physical network adapter; and then create two virtual network adapters for the VM, with each network adapter connected to one virtual switch.
- Install the server on your perimeter network between your edge and internal firewalls, with one network adapter connected to the External Perimeter Network, and one network adapter connected to the Internal Perimeter Network. This will not be demonstrated.
Prerequisites
Before proceeding with the configuration, the domain controller needs to have a static IP address with a DNS pointing to itself, and join the Contoso domain.
- Open a PowerShell terminal with privileged permissions (run as administrator).
- Execute the following, which will rename the server, set a static IP with a static DNS for the network card in the internal network and restart afterwards.
12345678910111213#Rename the server.Rename-Computer -NewName W2016-ras;#Static IP and DNS.$IP = "192.168.0.40"$DNS = "192.168.0.10"#Set static IP with DNS.New-NetIPAddress -InterfaceAlias Ethernet -IPAddress $IP -AddressFamily IPv4 -PrefixLength 24;Set-DnsClientServerAddress -InterfaceAlias Ethernet -ServerAddresses $DNS;#Restart the server.Restart-Computer -Force; - Now we need to join the Contoso AD domain. Run the following in a PowerShell terminal with elevated permissions. The server will restart.
1234567#Credentials.$Username = "Contoso\Administrator";$Password = 'Pa$$w0rd' | ConvertTo-SecureString -AsPlainText -Force;$Credential = New-Object -TypeName System.Management.Automation.PSCredential -ArgumentList $Username, $Password;#Join the server to the domain.Add-Computer -DomainName "contoso.com" -Credential $Credential -Restart; - Open the Windows firewall to allow traffic to the server.
12New-NetFirewallRule -DisplayName "VPN 500 (UDP) - Inbound" -Direction Inbound -LocalPort 500 -Protocol UDP -Action Allow;New-NetFirewallRule -DisplayName "VPN 4500 (UDP) - Inbound" -Direction Inbound -LocalPort 4500 -Protocol UDP -Action Allow;
RRAS
This procedure will install the RRAS role, and configure it to allow only IKEv2 connections.
- Open a PowerShell terminal with privileged permissions (run as administrator).
- Execute the following which will install the RAS.
1Install-WindowsFeature DirectAccess-VPN -IncludeManagementTools - Restart the server (this is a requirement before enrolling the certificate).
- Open “mmc.exe”, click on “File” and then “Add/Remove Snap-in”.

- Choose “Certificates” and click “Add”.
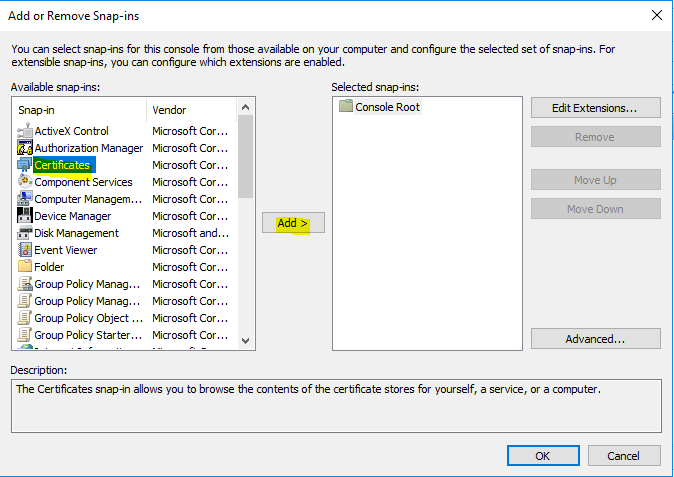
- Choose “Computer account”, and click “Next” and then “Finish”.
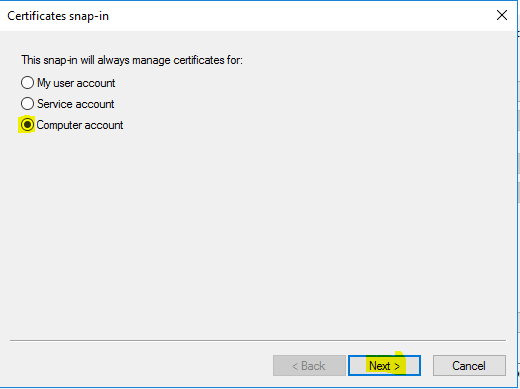
- Now click “OK”.

- Navigate to “Certificates (Local Computer)” à “Personal”. Right click on “Personal”, choose “All Tasks” and click on “Request New Certificate”.

- Click “Next”.
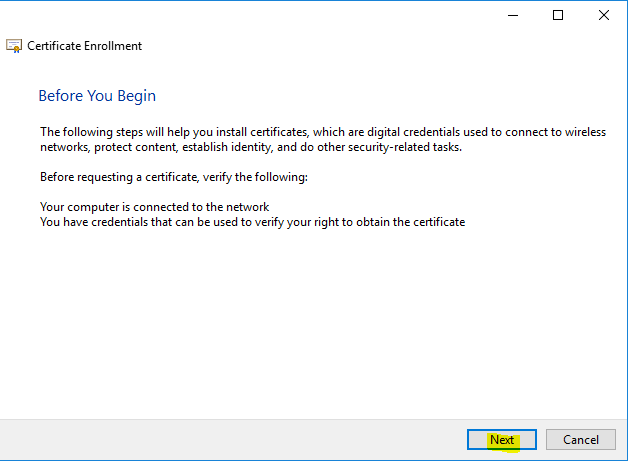
- Once again click “Next”.
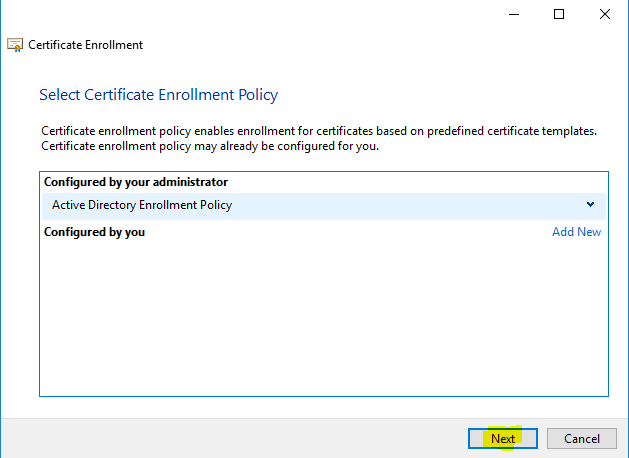
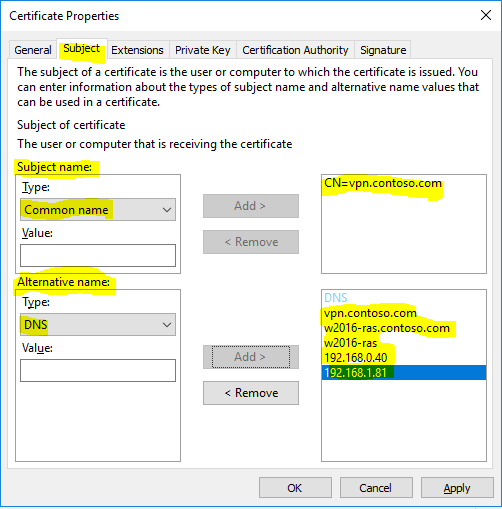
- Checkmark “VPN Server Authentication”, click on “Properties”.

- Under “Subject” tab configure the following values. Then click “OK”.
- Click on “Enroll”.
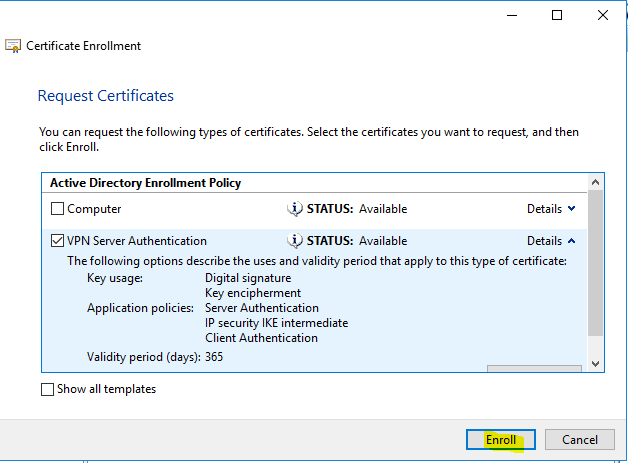
- Open “%SystemRoot%\system32\ServerManager.exe”.
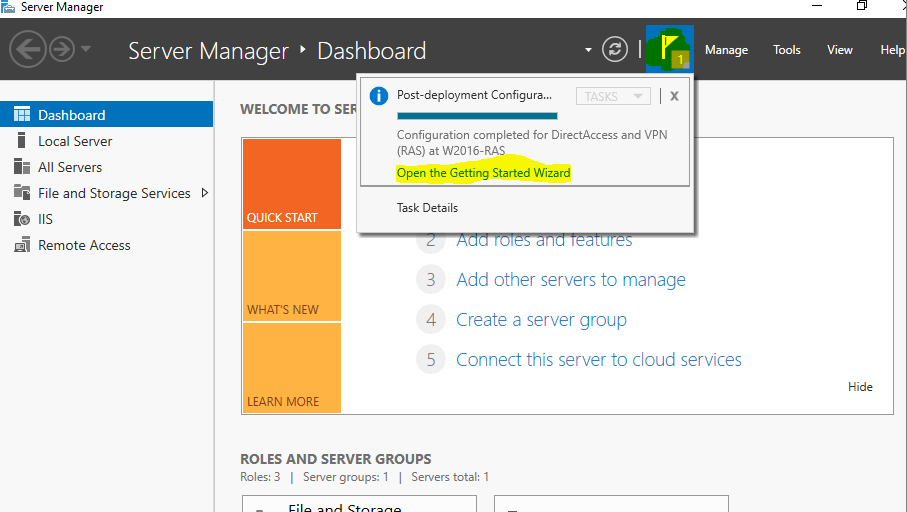
- Click on “Open the Getting Started Wizard” under notifications.
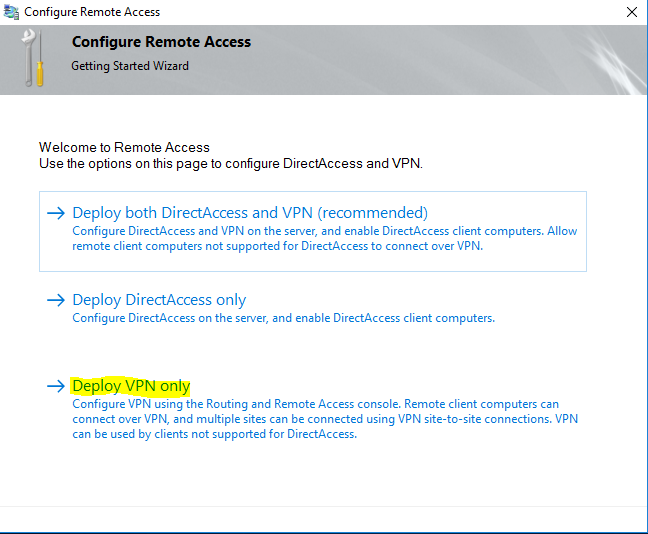
- If no window open, minimize all windows to see if it’s hidden. Click on “Deploy VPN only”.
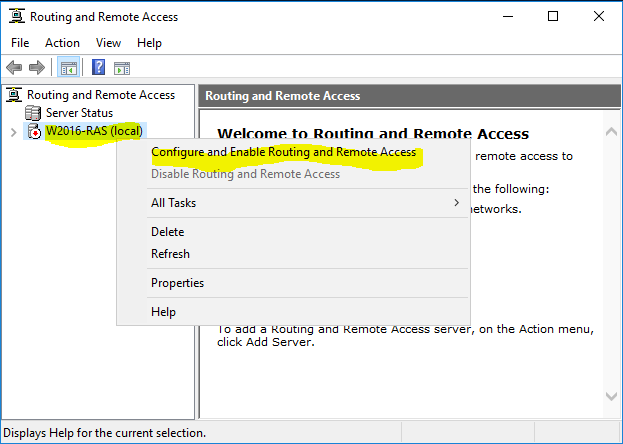
- Right click on “W2016-RAS (local)” and choose “Configure and Enable Routing and Remote Access”.
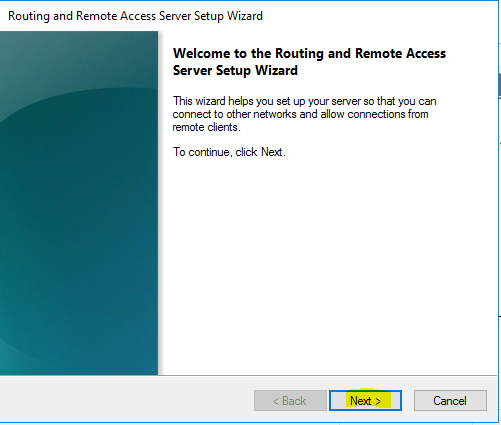
- Click “Next”.
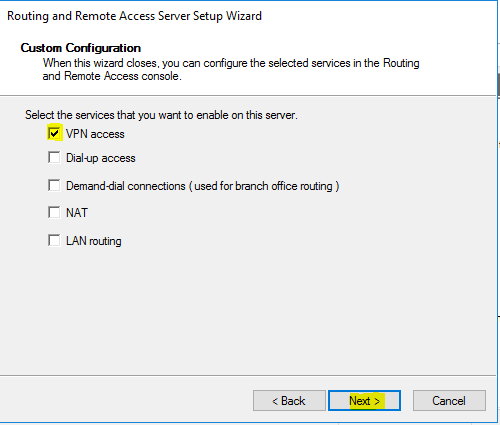
- Choose “Custom configuration” and click “Next”.

- Checkmark “VPN access” then Click “Next”.
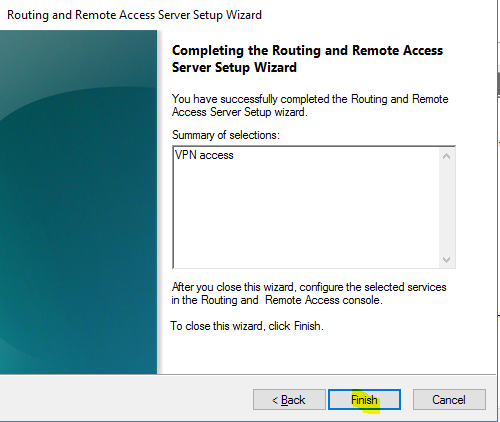
- Click on “Finish”.
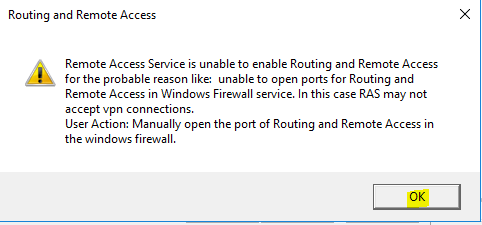
- Click on “OK” again.
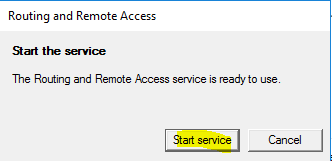
- Now click “Start service”.
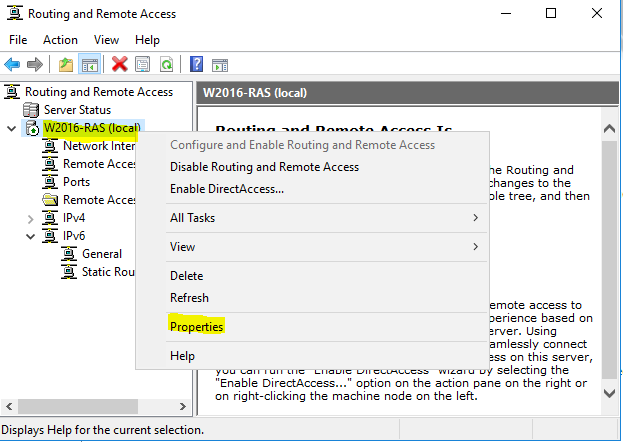
- Right click on “W2016-RAS (local)”, and choose “Properties”.
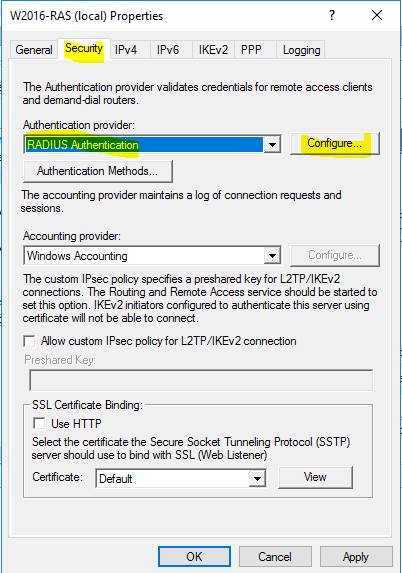
- On the “Security” tab, choose “RADIUS Authentication” as the authentication provider. Then click on “Configure”.
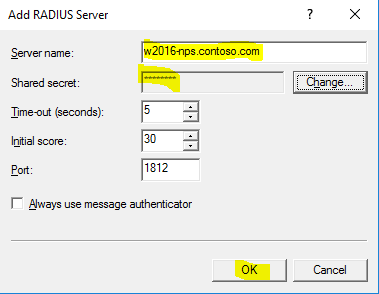
- Click on “Add”.

- Now enter “w2016-nps.contoso.com” in server name and type the shared secret. Click “OK” two times.
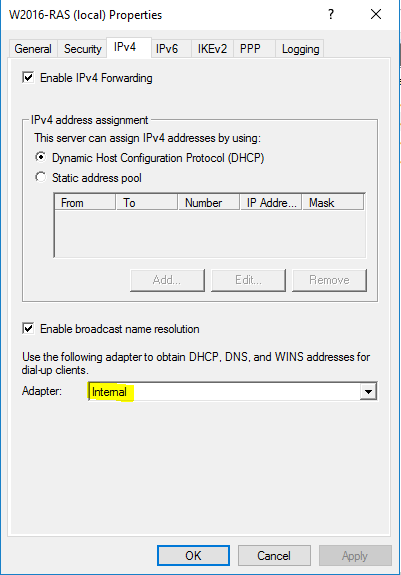
- On the “IPv4” tab, choose the adapter that is on the internal network in this example “Internal”. Then click “OK”.
- Under “W2016-RAS (local)” right click on “Ports” and choose “Properties”.
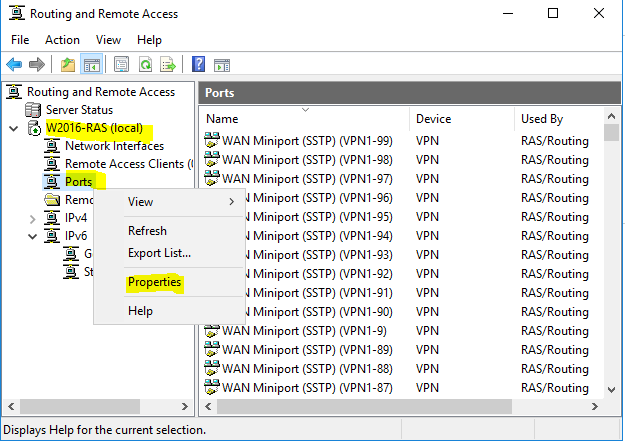
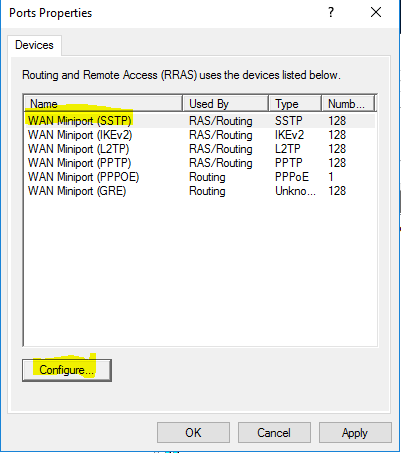
- Select “WAN Miniport (SSTP)” and click “Configure”.
- Clear “Remote access connections (inbound only)” and “Demand-dial routing connections (inbound and outbound)”. Click on “OK”.
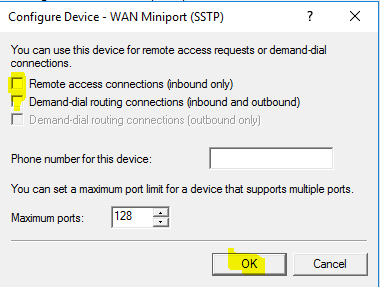
- Repeat step 19 and 20 for “WAN Miniport (L2TP)”, “WAN Miniport (PPPoE)” (Uncheck “Demand-dial routing connections (outbound only)”) and “WAN Miniport (PPTP)”.
- If you are using Windows Server 2012 R2 or Windows Server 2016 Routing and Remote Access Service (RRAS) as your VPN server, you must enable machine certificate authentication for VPN connections and define a root certification authority for which incoming VPN connections will be authenticated with. To do this, open an elevated PowerShell command and run the following commands.
123$VPNRootCertAuthority = "Contoso-CA";$RootCACert = (Get-ChildItem -Path cert:LocalMachine\root | Where-Object {$_.Subject -Like "*$VPNRootCertAuthority*"});Set-VpnAuthProtocol -UserAuthProtocolAccepted Certificate, EAP -RootCertificateNameToAccept $RootCACert -PassThru;
- Now reboot the server.
w10-client.contoso.com
On this device we are going to create the VPN profile template, so we can push it to other machines either through group policy or Intune.
Prerequisites
Before proceeding with the configuration, the client need to be renamed and joined the domain.
- Open a PowerShell terminal with privileged permissions (run as administrator).
- Execute the following, which will rename the client and restart afterwards.
12345#Rename the server.Rename-Computer -NewName W10-client;#Restart the server.Restart-Computer -Force; - Now we need to join the Contoso AD domain. Run the following in a PowerShell terminal with elevated permissions. The server will restart.
1234567#Credentials.$Username = "Contoso\Administrator";$Password = 'Pa$$w0rd' | ConvertTo-SecureString -AsPlainText -Force;$Credential = New-Object -TypeName System.Management.Automation.PSCredential -ArgumentList $Username, $Password;#Join the server to the domain.Add-Computer -DomainName "contoso.com" -Credential $Credential -Restart; - Due to this being setup in a lab, when need to edit the client hosts file. Open notepad as administrator, and open the file “C:\Windows\System32\drivers\etc\hosts”, then add the following line to the file.
1<external IP of w2016-ras.contoso.com> vpn.contoso.com
Client VPN Template
This will create the VPN template for client devices. You will need to download the PsExec to the client machine, before following the procedure.
- Open a command prompt as administrator.
- Change path to the downloaded PsExec utility, and run the following.
1psexec.exe –s –I cmd.exe - A new window will open, in this window type “powershell.exe”.
- Now copy the following into a XML file and save it (in this example we save it on the desktop). Name it “vpn.contoso.com.xml”
123456789101112131415161718192021222324252627282930313233343536373839<VPNProfile><NativeProfile><Servers>vpn.contoso.com</Servers><NativeProtocolType>IKEv2</NativeProtocolType><Authentication><MachineMethod>Certificate</MachineMethod></Authentication><RoutingPolicyType>SplitTunnel</RoutingPolicyType><!-- disable the addition of a class based route for the assigned IP address on the VPN interface --><DisableClassBasedDefaultRoute>true</DisableClassBasedDefaultRoute></NativeProfile><!-- use host routes(/32) to prevent routing conflicts --><Route><Address>192.168.0.10</Address><PrefixSize>32</PrefixSize></Route><Route><Address>192.168.0.20</Address><PrefixSize>32</PrefixSize></Route><Route><Address>192.168.0.30</Address><PrefixSize>32</PrefixSize></Route><Route><Address>192.168.0.40</Address><PrefixSize>32</PrefixSize></Route><!-- traffic filters for the routes specified above so that only this traffic can go over the device tunnel --><TrafficFilter><RemoteAddressRanges>192.168.0.10, 192.168.0.20, 192.168.0.30, 192.168.0.40</RemoteAddressRanges></TrafficFilter><!-- need to specify always on = true --><AlwaysOn>true</AlwaysOn><!-- new node to specify that this is a device tunnel --><DeviceTunnel>true</DeviceTunnel><!--new node to register client IP address in DNS to enable manage out --><RegisterDNS>true</RegisterDNS></VPNProfile> - Now save the following powershell script (again in this example we save it to the desktop). Name it “VPN_Profile_Device.ps1”.
123456789101112131415161718192021222324252627282930313233343536373839404142434445464748Param([string]$xmlFilePath,[string]$ProfileName)$a = Test-Path $xmlFilePathecho $a$ProfileXML = Get-Content $xmlFilePathecho $XML$ProfileNameEscaped = $ProfileName -replace ' ', '%20'$Version = 201606090004$ProfileXML = $ProfileXML -replace '<', '<'$ProfileXML = $ProfileXML -replace '>', '>'$ProfileXML = $ProfileXML -replace '"', '"'$nodeCSPURI = './Vendor/MSFT/VPNv2'$namespaceName = "root\cimv2\mdm\dmmap"$className = "MDM_VPNv2_01"$session = New-CimSessiontry{$newInstance = New-Object Microsoft.Management.Infrastructure.CimInstance $className, $namespaceName$property = [Microsoft.Management.Infrastructure.CimProperty]::Create("ParentID", "$nodeCSPURI", 'String', 'Key')$newInstance.CimInstanceProperties.Add($property)$property = [Microsoft.Management.Infrastructure.CimProperty]::Create("InstanceID", "$ProfileNameEscaped", 'String', 'Key')$newInstance.CimInstanceProperties.Add($property)$property = [Microsoft.Management.Infrastructure.CimProperty]::Create("ProfileXML", "$ProfileXML", 'String', 'Property')$newInstance.CimInstanceProperties.Add($property)$session.CreateInstance($namespaceName, $newInstance)$Message = "Created $ProfileName profile."Write-Host "$Message"}catch [Exception]{$Message = "Unable to create $ProfileName profile: $_"Write-Host "$Message"exit}$Message = "Complete."Write-Host "$Message"
- In the PowerShell terminal that was open from PsExec, run the following.
1.\VPN_Profile_Device.ps1 -xmlFilePath "C:\Users\Administrator\Desktop\vpn.contoso.com.xml" -ProfileName "vpn.contoso.com";
- Now try to move the device to the external network in the lab. The profile should automatically connect to the VPN.
You are done configuring your lab, the only thing left is to distribute the VPN profile through your mean of choice!
If you have any problems of questions please feel free to comment below.
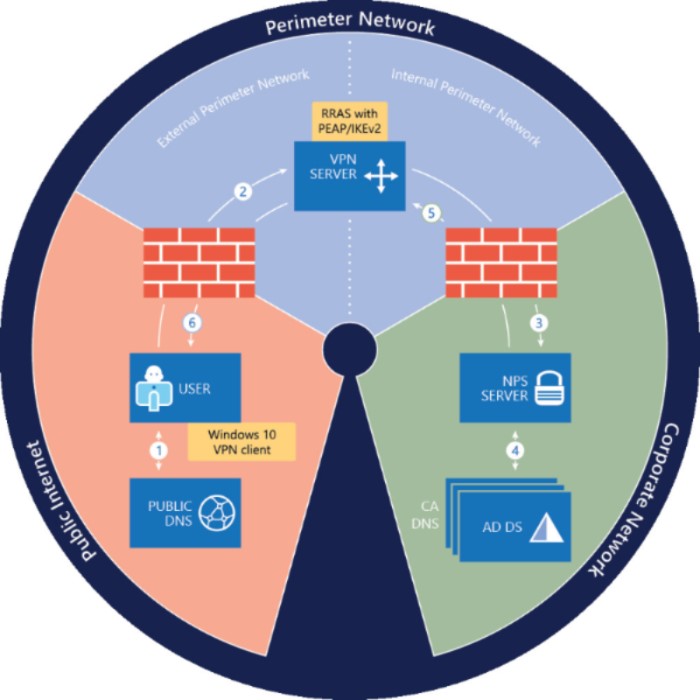
Thanks for this write up. I’m in the middle of it now and ran into a snag. I’m building the User cert template, but under the Cryptography tab, the Provider Catagory is greyed out. I can’t change it to the Key Storage Provider. What are my options?
Which template did you copy?
thanks.
I take it for the device tunnel to work the computer account needs to be added to AD group Contoso\sec-vpn-users in order to authenticate with NPS?
This article also only seems to show how to install the device tunnel but not user tunnel.
Hi Peter,
Yes, as I only needed device tunnel. I will soon create another post with both user tunnel and multi-factor authentication.
HI Alex,
Do you have any idea when you’ll finish the user tunnel write up ?
Great article, thank you! Will you be doing an article on the distribution of the VPN profile?
Hi Joe,
Yes, I will soon publish an article on how to publish the profile through SCCM, Intune and PowerShell.
Great piece!
I ran into a little problem on the way though. When configuring the NPS server where I try to configure the “Microsoft: Protected EAP (PEAP)” I get the error:
“Cannot configure EAP
A certificate could not be found that can be used with this Extensible Authentication Protocol”
Any ideas?
Kind regards,
Jorrit
Please contact me through email. Use the contact formular on this page.
Hello, did you solve it? I have the same problem.
Great and detailed article, nice work!
I’m in the test-phase of a deployment myself and having an issue with deploying a functional profile.
If I create the profile, I can connect to the VPN just fine. If I run the powershell script to “convert” it to an Always On VPN, It works on that client, but if I export the rasphone.pbk and import it on another system, the profile does not work (can’t autoconnect).
I’ve tried implementing the pre-script VPN profile and run the ps script as a scheduled task (run as SYSTEM) – it kinda works, profile is converted and all but can’t connect at all though. So currently desperately searching for a solution to this 🙂
Why are you exporting the pbk-file?
You need to deploy the script through GPO, SCCM, Intune or other similar deployment method.
Hi – Amazing article, we are just starting to properly look into AlwaysOn VPN to replace our (extremely) costly hardware based network extenders. Nice to finally find an end-to-end write up which is clear to follow. I am eagerly awaiting any follow up articles but in the meantime thank you soju have! Ian
Thanks! The best article I found!
Doing step-by-step implementation (over 3 times for now) in a testing environment got into the same error:
EveintID 20255
“The connection was prevented because of a policy configured on your RAS/VPN server…”
Any suggestions what I am doing wrong?
Thanks!
We can have a remote session, that would be easier for troubleshooting.
Thank you for this great and compact addendum to the offical ms documentation regarding “Always On” VPN which clearly lacks depth atm. Aside some minor typos id like to add a comment regardings NPS in case someone stumbles over this tutorial. NPS cant be deployed with server core and i came across the same error as alot of other people when deploying NPS on windows 2019. You have to manually open 1812/1813 UDP in the firewall even though there is a rule installed when deploying the NPS role. Use e.g “nmap -sU 1812 -v FQDN” to make sure NPS is actually listening …
thx & keep up with those quality tutz
regards
Good points! Im in the progress of writing up a tutorial on conditonal access. Stay tuned!
Now in the “Security” tab, add the NPS server group “Contoso\sec-server-vpn”, and checkmark “Enroll” and “Autoenroll” (autoenroll is not required in this example) to “Allow”. Click “OK”.
for this section, is VPN group or NPS group?
please clarify
Had a typo in the last step:
.\VPN_Profile_Device.ps1 -xmlFilePath “C:\Users\Administrator\Desktop\vpn.contoso.com.xml” -ProfileName “vpn.contoso.com”;
Where it couldn’t find the .xml file, but it still complete. Running it again with the path corrected, but it states that the profile already exists.
How do I go about undoing that command and removing the profile so it gets created while reading the .xml file correctly?
You should be able to delete the VPN profile from the Network Connections panel (“change adapter settings”).
If you are using device tunnels, use the “Remove-VpnConnection” cmdlet with SYSTEM.
https://docs.microsoft.com/en-us/powershell/module/vpnclient/remove-vpnconnection?view=win10-ps
If it tells you the profile is use, run the: /disconnect
rasdial “
Just before removing
Great write up, managed to follow and get this working.
One question i have though, if you wanted to load balance the RRAS server with an external load balancer such as Kemp, is that possible? Struggling to find anything that helps
Yep, see https://directaccess.richardhicks.com/2018/09/17/always-on-vpn-ikev2-load-balancing-with-kemp-loadmaster/
Hi
I have performed every step successfully
How do I move Azure Vm to other network
last step in this article
Azure VM?
yes
Not sure what you mean.
Is it because your client is in Azure?
ok,
what do you mean by move the device to the external network in the lab in last step
You need to move your client outside the local area network. It needa to resolve the external DNS-record to the ouside IP-address of the RRAS server.
What exactly does step 33 under RAS do with the RRAS server? Is the NPS server still involved after issuing this command?
It basically just allow the RAS server to accept certificate authentication (EAP). The NPS server still check the identity of the incoming request.
A certificate could not be found that can be used with this Extensible Authentication Protocol”
Please advise. Very good write up.
You need to choose the right EKU for the certificate. Where are you getting the error?
Is TPM a requirement for the AOVPN server? You have to jump through several hoops to TPM working inside of VMs in vSphere (You need a Key Management Server, etc.).
-https://docs.microsoft.com/en-us/windows-server/remote/remote-access/vpn/always-on-vpn/deploy/vpn-deploy-server-infrastructure#create-the-user-authentication-template
No, you do not need a TPM chip. But it would be a good security measure!
I agree, the TPM is certainly more inline with best practices – I am currently at a more “proof on concept” stage, so assuming this works as desired, we would build this out differently. Instead of using “Microsoft Platform Crypto Provider” to store the keys in TPM, would I only select “Microsoft Software Key Storage Provider”?
Thanks!
Has anyone has success in configuring an Always-On VPN with a Fortigate virtual appliance.
How long does this take from start to finish?
If you are fast, and all networking is in place. You can do this in an hour
In the NPS configuration section, I also am having an issue at step 9 under the NPS setup section, when I hit the configure button.
“Cannot configure EAP
A certificate could not be found that can be used with this Extensible Authentication Protocol”
Any ideas? Up to this point, all parts of the NPS section seemed to match up well. Different machine names, IP addresses, etc, but expected results.
Too add a bit more detail, and possible addressing EKU concerns, looking at the CA I generated, under certmrg.msc from both the CA server itself and the NPS server, under the properties section for the CA certificate, in the General tab, “Enable all purposes for this certificate” is selected.
Hello
Thanks for the great article. All has gone well until I run the final PS line.
I receive an error $a = Test-Path $xmlfilepath
Test-Path : Cannot bind argument to parameter ‘Path’ because it is an empty string.
At line:1 char:16
+ $a = Test-Path $xmlfilepath
+ ~~~~~~~~~~~~
+ CategoryInfo : InvalidData: (:) [Test-Path], ParameterBindingValidationException
+ FullyQualifiedErrorId : ParameterArgumentValidationErrorEmptyStringNotAllowed,Microsoft.PowerShell.Commands.Test
PathCommand
Any thoughts? Thanks
You need to make sure that the path to the xml file isn’t empty.
Hi,
Once you have deployed the profile, how would you update it? For example if I wanted to add a new network? I cant find where it references the xml file and the properties of the VPN dont have this information
thanks
Either through SCCM, Intune or GPO
Hey,
Great guide.
Should the common name for the vpn server cert be the public dns name or the internal name? A few articles out there have this mixed so it’s a bit ambiguous.
Thanks
Doesn’t matter. As long as both parties (server/client) trust it.
Hi,
thanks for the article. But,I have a question: to implement “always on VPN” with user tunnel, is it necessary to first create a Point to Site VPN with Azure?
Did you write a tutorial like this also for “user tunnel”?
Thanks
You dont have to use Azure. It’s almost the same steps for user tunnels.
Thank you for the great post.
We need to add some new routes to our existing profiles. When we rollout a new profile with ConfigMgr + Powershell we have the problem, that some users have problem with Kerberos. Most times a reconnect solves the problem but sometimes we need to reboot the system or create the profile again. That is very annoying and produce a lot of tickets.
Do you have a hint for me?
Thank you!
Maybe a firewall issue?
You ever try running the CA on server core?
Nope, never 🙂
Thank you for the great post. I have a question. With which program did you draw “Technical Drawing”?
Microsoft Visio 🙂
Hello sir, I am a first grade computer science student. I used the your contents a lot. Thank you very much for that. I have a question. I would be glad if you answer. I can’t make the “Always VPN” at home. My computer is very slow, so virtual machines work very slowly. I really want to work on “Always On VPN”. As you said, remote access does not support on Azure but can I host servers on AWS or Google Cloud?
Thank you for the informative post.
Question : Have you tired to config the AlwaysOnProfile xml profile with names-based trigger . I am followed technet documentation https://docs.microsoft.com/en-au/windows/security/identity-protection/vpn/vpn-auto-trigger-profile (Names-based trigger) but the vpn is not auto-triggered and not getting if I tired to access – resolve any site-resource from the configured domain suffix .
hrsite.corporate.contoso.com
1.2.3.4,5.6.7.8
5.5.5.5
true
.corp.contoso.com
10.10.10.10,20.20.20.20
100.100.100.100
Do you have any working config ? Any info about how to troubleshoot the issue on the client machine ?Thanks
Great article but i ran into errors
Client-side
CoId={11C587C7-9122-4143-BF30-E51BADBF7119}: The user dialed a connection named 001 which has failed. The error code returned on failure is 812.
RAS-side
CoId={D2416AC2-5B4D-EE80-D100-5A3AB5158810}: The following error occurred in the Point to Point Protocol module on port: VPN2-127, UserName: . The connection was prevented because of a policy configured on your RAS/VPN server. Specifically, the authentication method used by the server to verify your username and password may not match the authentication method configured in your connection profile. Please contact the Administrator of the RAS server and notify them of this error.
Could you help me please. Thanks!
Hello, I was wondering why the AOVPN server sitting on the edge needed to be on the domain? Is that not a security risk?
It dont have to be on the Domain. 🙂
So your guide here will work either way?
Hi, Great article but I get the following error
I ran into a little problem on the way though. When configuring the NPS server where I try to configure the “Microsoft: Protected EAP (PEAP)” I get the error:
“Cannot configure EAP
A certificate could not be found that can be used with this Extensible Authentication Protocol”
Thanks
Great guide and much better than the MS documentation.
Can all the roles apart from the DC be on one server? Or will this not work?
Most roles can co-exist but I would not recommend it.
Hello Alex,
first of all – this is a nice guide which have helped me well.
Is it possible, to configure the NPS- or the RRAS-Server so, that if I have got two different DHCP-Scopes, the Client of user A in AD-Group x gets IP of Scope 1 and Client of user B in AD-Group y gets IP of Scope 2?
The goal would be to seperate network-access by different users.
BR Denis
Hi Denis,
No, not with RRAS. You can use third party VPN servers such as KEMP, Citrix etc.
Hello Alex,
first of all – this is a nice guide which have helped me well.
Is it possible, to configure the NPS- or the RRAS-Server so, that if I have got two different DHCP-Scopes, the Client of user A in AD-Group x gets IP of Scope 1 and Client of user B in AD-Group y gets IP of Scope 2?
The goal would be to seperate network-access by different users.
BR Denis
Hello Alex.
amazing guide, followed to the letter and everything went great, but when I try to connect I get the following error:
“Verifying username and password…IKE failed to find valid machine certificate. Contact your Network Security Administrator about installing a valid certificate in the appropriate Certificate Store.”
any ideas on how to fix this?
Thanks
J.S.
Seems like you are either missing a client certificate or the settings in the NPS is wrong.
Hi Alex,
just a quick follow up, I rechecked all steps on the RRAS server, and looks like I skipped steps 33 and 34 once I did those, it now gives me a different error, not being able to assign an IP, which I believe is caused on not reaching the DHCP server, so I’ll work on that later today. I guess some DHCP relay rules and making sure server is reachable with static routes.
Thanks again on the amazing guide
So I did all the steps, but when I use the ps1 to create the VPN profile, it says that it creates, but the VPN profile isn’t showing up and theres no way to manually connect to it. Any thoughts?
If you are just testing the connection, you can manually create a VPN profile through the GUI.
Could you please describe how you solved the “A certificated could not be found that can be used with this extensible authentication protocol”. I would really appreciate the help.
Hi,
thanks for the awesome article!
We have a user tunnel working, and would now also like to enable a device tunnel since our clients are upgraded to 1909.
In the device tunnel i enabled :
* alwayson true
* splittunnel
* registerdns enabled
* I’ve added a route with /32 to each DC/DNS, CA servers (issuing), and fileserver (roaming profile)
The device tunnel seems to work, since I can for example get an account locked out message on logon when it’s locked, but quite often my laptop gets stuck on the welcome screen, or “one moment please” circle.
If I’m able to logon, I see that the user tunnel isn’t working. I am for example able to ping dc’s and other ip’s I added in the routes.
Did you ever finish the guide on how to deploy this? Or how to create this for users instead of computers?
I followed all the steps, finished the last steps, no profile was created.
How do I go about deploying this to end users?
Hi when i finish and try to connect the client to the vpn i get “the ike credentials are unacceptable”
Can you please help me
Great and straight forward guide. I have read it, and before actually doing it, I have a question about the cert webenrollment. Is it needed?
I ask because we already have a CA in place working, and when I read 21) “Now we disable RPC for the interface ICertPassage. In an elevated command prompt, run the following command.” do I really want to do this? I guess our existing CA uses RPC for enrollment already.
/Lars.
Hi Lars,
Only if your firewall doesn’t support the RPC exchange (dynamically) port opening. It’s better to only open for one port instead of a whole range.
Hi Folks!
When configuring the NPS server where I try to configure the “Microsoft: Protected EAP (PEAP)” I get the error:
“Cannot configure EAP
A certificate could not be found that can be used with this Extensible Authentication Protocol”
Thanks
You need to import a valid certificate on the NPS server in the computer store.
What certificate valid I need to import?
I solved, I had to restart my certificate server, then NPS server received the certificate
Hey man, this is a really great guide. Any chance you have some insight on creating a user tunnel? Specifically for non-AD joined machines like Mac?
Also, as a couple other people mentioned, I’m getting the error:
“CoId={D2416AC2-5B4D-EE80-D100-5A3AB5158810}: The following error occurred in the Point to Point Protocol module on port: VPN2-127, UserName: . The connection was prevented because of a policy configured on your RAS/VPN server. Specifically, the authentication method used by the server to verify your username and password may not match the authentication method configured in your connection profile. Please contact the Administrator of the RAS server and notify them of this error.”
hi, I have found this to be extremely useful,, in depth,, just a silly (though very basic) question,, (forgive me for my ignorance)
Q: Do we need 4 physical computers for this setup, like in the diagram it shows physical machines (PCs) for RAS, NPS, CA & AD-DS roles. if so, then it means we need to have 4 licenses for Windows server on each of these computers,, or all these roles can be installed on a single physical PC.,, although all clients will be separate machines,,,
Your feedback will be highly appreciated
You could merge the DC and CA. Also the RRAS and NPS. But i recommend to have these roles seperated.