The cloud management gateway (CMG) provides a simple way to manage Configuration Manager clients on the internet. By deploying the CMG as a cloud service in Microsoft Azure, you can manage traditional clients that roam on the internet without additional infrastructure. You also don’t need to expose your on-premises infrastructure to the internet.
A cloud-based distribution point is a System Center Configuration Manager distribution point that is hosted in Microsoft Azure. The following information is intended to help you learn about configurations and limitations for using a cloud-based distribution point.
In this step-by-step guide, I will demonstrate how to configure and establish a Cloud Management Gateway (CMG) and Cloud Distribution Point (CDP) in SCCM and Azure.
In order to walk you through the entire process of setting up the Cloud Management Gateway and Cloud Distribution Point features, I am going to break this down into 6 parts.
- Overview
- Certificates
- Azure Service
- Cloud Management Gateway
- Cloud Distribution Point
- Log Files
1. Overview
In this part I will outline the overview for the server names, prerequisites and DNS records.
Prerequisites
In this guide I assume that you already have the basic technologies setup. The following should already be configured, before you can follow this step-by-step tutorial.
- A System Center Configuration Manager (SCCM) environment that is at least running version 1802.
- The SCCM management point server needs to have access to Azure services either through a proxy or “directly”. You can find which ports should be open here.
- You should already have an certificate authority setup running, preferably Microsoft Active Directory Certificate Services (AD CS).
- This guide also will use HTTPS between ConfigMgr and your clients. So in regards to that, you need to have enrolled certificates (Client Authentication) for your workstations through AD CS with group policy object (GPO) or similar.
- A working Azure AD with Azure AD Connect configured.
- Windows Clients running at least version 1709.
- An Microsoft Azure subscription.
Just give you an overview on the servers and DNS records involved with this setup. The server names can almost be anything you want, except the CMG service on Azure. The following DNS records are just examples, change it to your naming conventions.
- sccm.contoso.com
- This is the SCCM management point server. This will be an A-record on your corporate network.
- contosocmg.cloudapp.net
- This will be the Cloud Management Gateway service (virtual machine) in your Azure subscription.
- cdp.contoso.com
- This will be your distribution point, that will deliver your application/packages/updates to your clients outside the corporate network. This will be a CNAME to a Azure service.
In the next part, we will configure the certificate templates in AD CS and create the certificate that should be used in the environment.
One of the most confusing part in configuring Cloud Management Gateway (CMG) and Cloud Distribution Point (CDP) is the certificate part.
2. Certificates
In this part we will create 1 certificate template, and create 3 certificates which includes Azure Management Certificate, Cloud Management Gateway certificate and Cloud Management Point certificate.
Azure Management Certificate
An Azure Management certificate is required to deploy Azure services by authenticating with service management APIs. Run the following on the SCCM server. It will create a self-signed certificate and export it at “C:\Certificates”. There will be a .cer and a .pfx file in the output folder. Remember to change the variable $DNSName and $Password to your environment.
|
1 2 3 4 5 6 7 8 9 10 11 12 13 14 15 16 17 18 19 20 21 22 23 24 25 26 |
#Output directory for the certificate. $OutputFolder = "C:\Certificates"; #DNS. $DNSName = "contosocmg.cloudapp.net"; #Certificate password. $Password = "<password here>"; #Create self-signed certificate. $Certificate = New-SelfSignedCertificate -DnsName $DNSName -CertStoreLocation "cert:\LocalMachine\My"; #Convert password to a secure string. $SecurePassword = ConvertTo-SecureString -String $Password -Force -AsPlainText; #Check if the folder exist. If(!(Test-Path $OutputFolder)) { New-Item -Path $OutputFolder -ItemType Directory; } #Export the certificate with private key. Export-PfxCertificate -Cert $Certificate -FilePath ($OutputFolder + "\" + $DNSName + ".pfx") -Password $SecurePassword; #Export the certificate with public key. Export-Certificate -Type CERT -Cert $Certificate -FilePath ($OutputFolder + "\" + $DNSName + ".cer"); |
Cloud Services Certificate Template
We now need to create a template where we can enroll two certificate for the CMG and CDP.
- Go to the issuing certificate authority server.
- Open “%windir%\system32\certsrv.msc”.
- Right click “Certificate Template”, then choose “Manage”.

- Now find the template “Web Server”, right click and choose “Duplicate Template”.

- In the “Compability”-tab configure the following.
- In the “General”-tab configure the following.
- In the “Security”-tab and add a security group containing your SCCM servers (or just the SCCM server computer object). Give the group “Allow Read” and “Enroll”.

- In the “Request Handling”-tab and check mark “Allow private key to be exported”.

- Now click “OK”.
- Now go back to “%windir%\system32\certsrv.msc”.
- Right click “Certificate Templates”, choose “New” and “Certificate Template to Issue”.

- Now find and highlight the “SCCM Cloud Services Certificate” template, click “OK”.

Cloud Management Gateway Certificate
The CMG creates an HTTPS service to which internet-based clients connect. The server requires a server authentication certificate to build the secure channel.
Please be aware that the screenshots may not fit the names used in this environment. But I will make clear what to write to avoid confusion.
- Access the SCCM server.
- Open “MMC” through a command prompt.

- Go to “File” and choose “Add/Remove Snap-In”.

- Select “Certificates” and click “Add”.

- Choose “Computer account”.

- Now click “Finish”.

- Click “OK”.

- Navigate to “Certificates (Local Computer)”, “Personal” and right click “Certificates”. Then choose “All Tasks” and “Request New Certificate”.
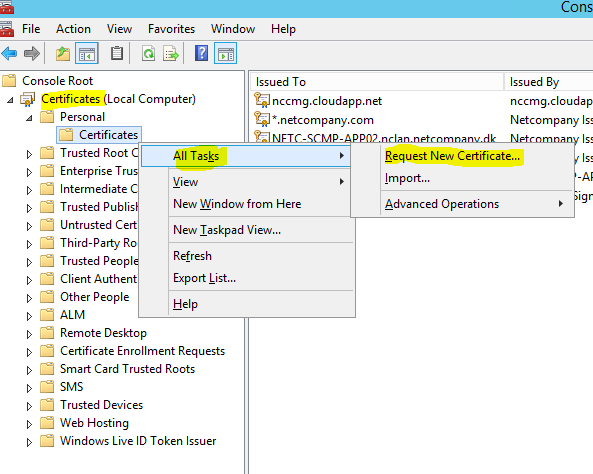
- Click “Next”.

- Click “Next” again.

- Choose “SCCM Cloud Services Certificate” and click on the warning icon.

- On the “Subject” tab configure the following.
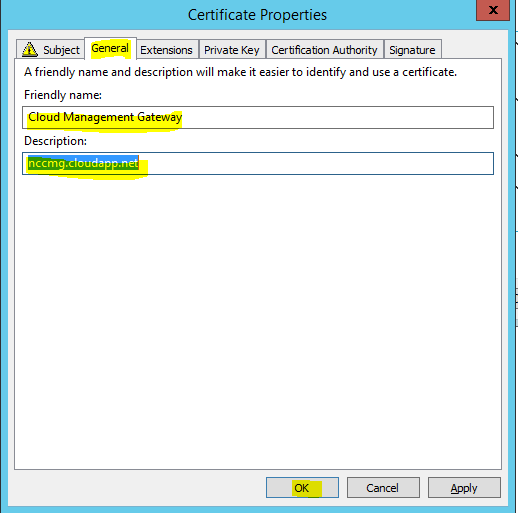
- On the “General” tab configure the following. Then click on “OK”.
- Click on “Enroll”.

- Click on “Finish”.

- Now open “%windir%\system32\certsrv.msc” again.
- Navigate to “Certificates (Local Computer)”, “Personal” and “Certificates”. Find the “Cloud Management Gateway” certificate, right click it and choose “All Tasks” and then “Export”.

- Click on “Next”.

- Check mark “Yes, export the private key”. Click “Next”.

- Check mark “Export all extended properties”, and click “Next”.

- Check mark “Password”, and write a password (note it down for further use!) for the .pfx Then click “Next”.

- Choose an output location and name the file “contosocmg.cloudapp.net.pfx” (screenshot states nccmg.cloudapp.net.pfx), click “Next”.

- Click “Finish”.

- Then click “OK”.

Cloud Distribution Point Certificate
The Configuration Manager cloud-based distribution point service certificate establishes trust between the Configuration Manager clients and the cloud-based distribution point and secures the data that clients download from it by using Secure Socket Layer (SSL) over HTTPS.
This will create a certificate to use with the cloud management gateway. It looks very similar as Cloud Management Gateway, but with a few changes.
- Access the SCCM server.
- Open “MMC” through a command prompt.

- Go to “File” and choose “Add/Remove Snap-In”.

- Select “Certificates” and click “Add”.

- Choose “Computer account”.

- Now click “Finish”.

- Click “OK”.

- Navigate to “Certificates (Local Computer)”, “Personal” and right click “Certificates”. Then choose “All Tasks” and “Request New Certificate”.

- Click “Next”.

- Click “Next” again.

- Choose “SCCM Cloud Services Certificate” and click on the warning icon.

- On the “Subject” tab configure the following.
- On the “General” tab configure the following. Then click on “OK”.
- Friendly name: Cloud Distribution Point
- Description: cdp.constoso.com (screenshot states nccdp.netcompany.com)

- Click on “Enroll”.

- Click on “Finish”.

- Now open “%windir%\system32\certsrv.msc” again.
- Navigate to “Certificates (Local Computer)”, “Personal” and “Certificates”. Find the “Cloud Distribution Point” certificate, right click it and choose “All Tasks” and then “Export”.

- Click on “Next”.

- Check mark “Yes, export the private key”. Click “Next”.

- Check mark “Export all extended properties”, and click “Next”.

- Check mark “Password”, and write a password (note it down for further use!) for the .pfx Then click “Next”.

- Choose an output location and name the file “cdp.netcompany.com.pfx” (screenshot states nccmg.cloudapp.net.pfx), click “Next”.

- Click “Finish”.

- Then click “OK”.

Export Certificate Authority Certificate
It’s nessesary to export the certificate authority certificates so we can establish trust between the CMG and the SCCM mangement point.
- Access the SCCM server.
- Open “MMC” through a command prompt.

- Go to “File” and choose “Add/Remove Snap-In”.

- Select “Certificates” and click “Add”.

- Choose “Computer account”.

- Now click “Finish”.

- Click “OK”.

- Now navigate to “Certificates (Local Computer)”, “Trusted Root Certification Authorities” (screenshot is wrong) and then “Certificates”. Right click on the root authority certificate, choose “All Tasks” and click “Export”.
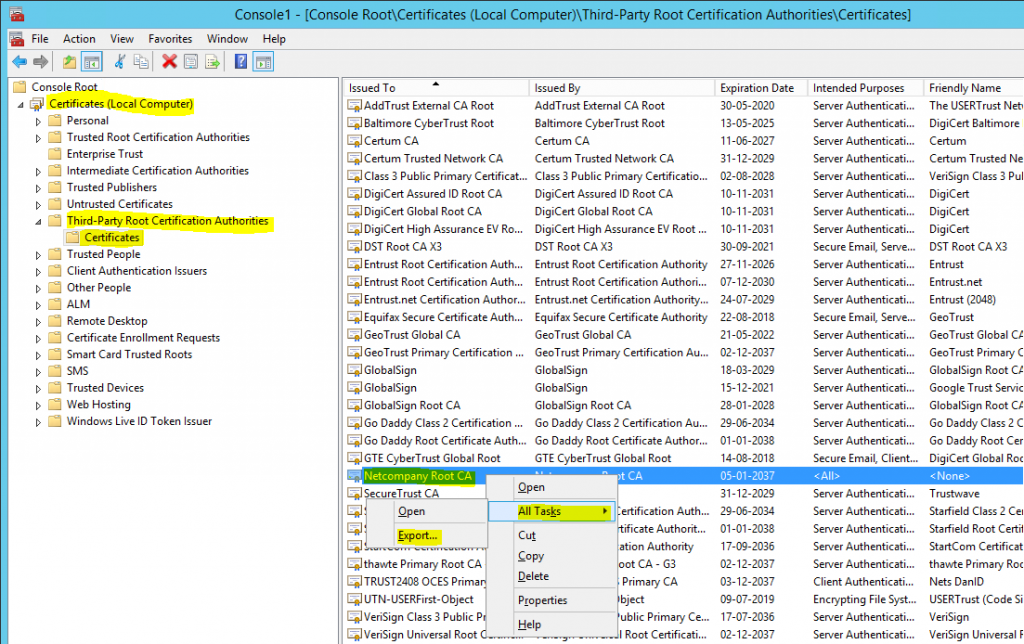
- Click “Next”.
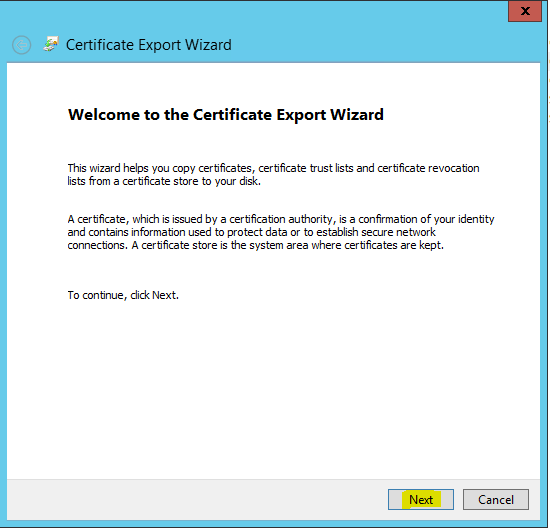
- Click “Next” once again.

- Choose an output folder, and click “Next”.

- Click “Finish”.

- Then click “OK”.

- Now navigate to “Certificates (Local Computer)”, “Intermediate Certification Authorities” and then “Certificates”. Right click on the intermediate authority certificate, choose “All Tasks” and click “Export”.

- Repeat step 9. to 13. If you are more than one issuing certificate authority please repeat the process multiple times.
Now we have created all necessary certificates that we need to use in the environment.
In the next part of the series we will configure the Azure Service that is a requirement before configuring the CMG and CDP.
3. Azure Services
Starting in version 1802, you can create the Cloud Management Gateway (CMG) using an Azure Resource Manager deployment. Azure Resource Manager is a modern platform for managing all solution resources as a single entity, called a resource group. When deploying CMG with Azure Resource Manager, the site uses Azure Active Directory (Azure AD) to authenticate and create the necessary cloud resources. This modernized deployment does not require the classic Azure management certificate.
The CMG wizard still provides the option for a classic service deployment using an Azure management certificate. To simplify the deployment and management of resources, using the Azure Resource Manager deployment model is recommended for all new CMG instances.
In this part we are going to configure the Configuration Manager site to connect Azure AD and allow Azure AD joined machine authenticate with ConfigMgr.
- Connect to the SCCM server, and open “Configuration Manager Console”.
- Navigate to “Administration”, “Cloud Services” and right click “Azure Services” and choose “Configure Azure Services”.

- Write “Cloud Management” as the name, and choose “Cloud Management”. Click “Next”.

- In the “Web app” area, click “Browse”.

- Click on “Create”.

- In the dialog box, specify the following. Click on “Sign in”.
- Login with credentials that have permissions to the Azure tenant.

- Highlight “ConfigMgr-ServerApp”, and click “OK”.

- Now click “Browse” on the “Native Client App”.

- Click “Create”.

- Now specify the following and click “Sign in”.
- After sign-in with your Azure account, click “OK“.

- Highlight “ConfigMgr-ClientApp”, and click “OK”.

- Now click “Next”.

- Ensure that the checkmark “Enable Azure Active Directory User Discovery” is checked, then click “Next”.

- Click “Next” again.

- Now click “Close”.

- Go to “https://portal.azure.com”.
- Navigate to “Azure Active Directory” and then “App registrations”.
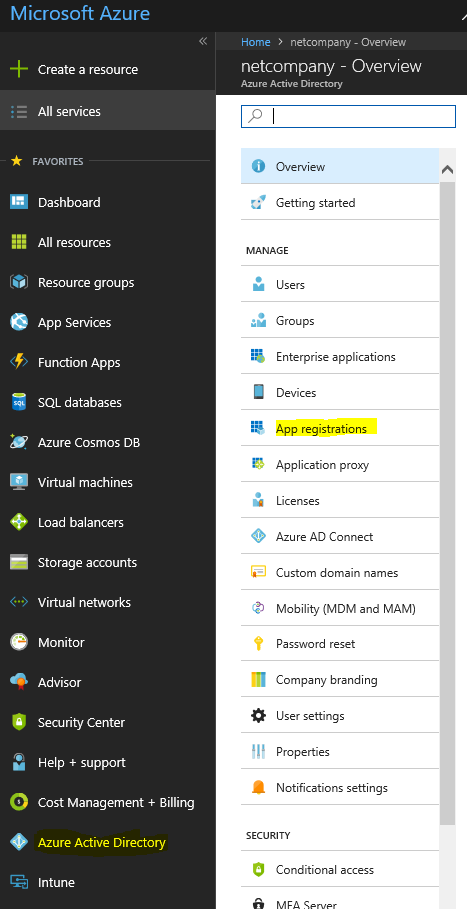
- Find and click on “ConfigMgr-ServerApp” or “ConfigMgr-ClientApp” (repeat steps).

- Click on “Settings”, choose “Required permissions”, and then click “Grant permissions”.

- Now go back to the SCCM server and open “Configuration Manager Console”.
- Right click under “Cloud Management” on “Azure Active Directory User Discovery”, then choose “Run Full Discovery Now”.

- Click “Yes”.

The SCCM server is now communicating with Azure AD, which allows clients to authenticate with their machines/users.
In the next part we will configure the Cloud Management Gateway.
4. Cloud Management Gateway
ConfigMgr 1610 introduced the Cloud Management Gateway, an Azure based solution to manage clients on internet. The benefit is that you don’t expose your infrastructure on the internet. The Azure VM(s) running behind the Cloud Management Gateway (Azure web service) are managed by Microsoft.
At a high level, the clients communicate to an Azure web service which acts a proxy to forward ConfigMgr client traffic to the on-premise MP/SUP via a new Site System role called Cloud Management Gateway Connection Point. For content distribution, you can leverage a Cloud Distribution Point. The Software Update contents are downloaded directly from Windows Update.
In this part we are going to configure the Cloud Management Gateway.
Azure Management Certificate
We need to upload a management certificate to Azure. An Azure management certificate is required to deploy Azure services by authenticating with service management APIs.
- Open “https://portal.azure.com”.
- Now search after “Subscriptions” in the search bar, then click on “Subscriptions”.

- Now click on the subscription (if there is more than one).

- Click on “Management certificates”.

- Now press the “Upload” button.

- Choose the correct subscription, and browse to the file of the Azure Management self-signed .cer file create in the certificate part.

Azure Cloud Service
Azure Cloud Services is an example of a platform as a service (PaaS). Like Azure App Service, this technology is designed to support applications that are scalable, reliable, and inexpensive to operate. In the same way that App Service is hosted on virtual machines (VMs), so too is Azure Cloud Services. However, you have more control over the VMs. You can install your own software on VMs that use Azure Cloud Services, and you can access them remotely.
- Open “https://portal.azure.com”.
- Search and click on “Cloud Services”.

- Click on “Add”.

- Configure the details like the following, and click “Create”.
- Now click on “Save“/”OK“.
CMG
Let start configuring the CMG on the SCCM server.
- Connect to the SCCM server, and open “Configuration Manager Console”.
- Navigate to “Administration”, “Cloud Services”, right click on “Cloud Management Gateway” and choose “Create Cloud Management Gateway”.

- Choose “Azure Resource Manager deployment”, then click on “Sign In”.

- Login with your credentials to the Azure tenant.
- Now click “Next” (make sure you are connected to the correct subscription ID, if you have multiple subscriptions).

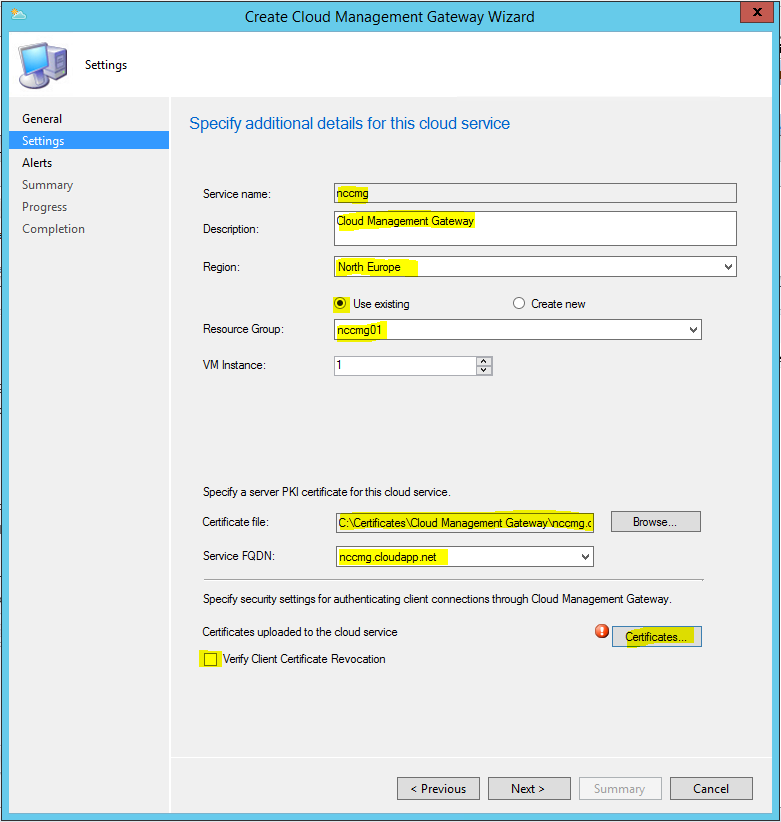
- Now specify the following. Then click on “Certificates”.
- Description: Cloud Management Gateway
- Region: North Europe
- Resource Group: Use the resource group you created at Azure Cloud Service above.
- VM Instance: 1
- Certificate file: Choose the certificate “Cloud Management Gateway” that was created in part 2.
- Service FQDN: contosocmg.cloudapp.net
- Verify Client Certificate Revocation: Uncheck
- Click “Add”.

- Now browse and add root and intermediate authority, that was exported in part 2. Then click “OK”.

- Now click “Next”.
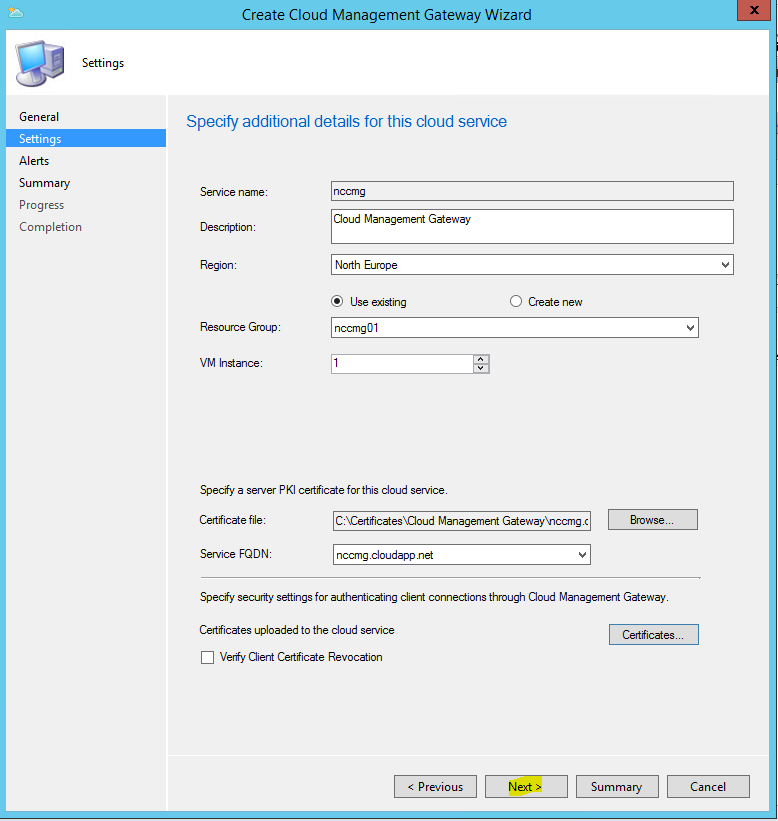
- Click “Next” again.

- “Next” again.

- Now click “Close”.

Site System Role
The CMG connection point site system role enables a consistent and high-performance connection from the on-premises network to the CMG service in Azure. It also publishes settings to the CMG including connection information and security settings. The CMG connection point forwards client requests from the CMG to on-premises roles according to URL mappings.
- Connect to the SCCM server, and open “Configuration Manager Console”.
- Navigate to “Administration”, “Site Configuration”, right click on “Servers and Site System Roles” and right click on the primary site server. Click “Add Site System Roles”.

- Click “Next”.

- Click “Next” again.

- Checkmark “Cloud management gateway connection point”. Then “Next”.

- Choose the CMG, and click “Next”.

- Then click on “Next”.

- Now click “Close”.

Certificate Revocation List (CRL)
If the CRL is not published to the internet, we need to disable so the clients do not try to check the CRL.
- Connect to the SCCM server, and open “Configuration Manager Console”.
- Navigate to “Administration”, “Site Configuration”, “Sites”. Then right click on the site, and select “Properties”.
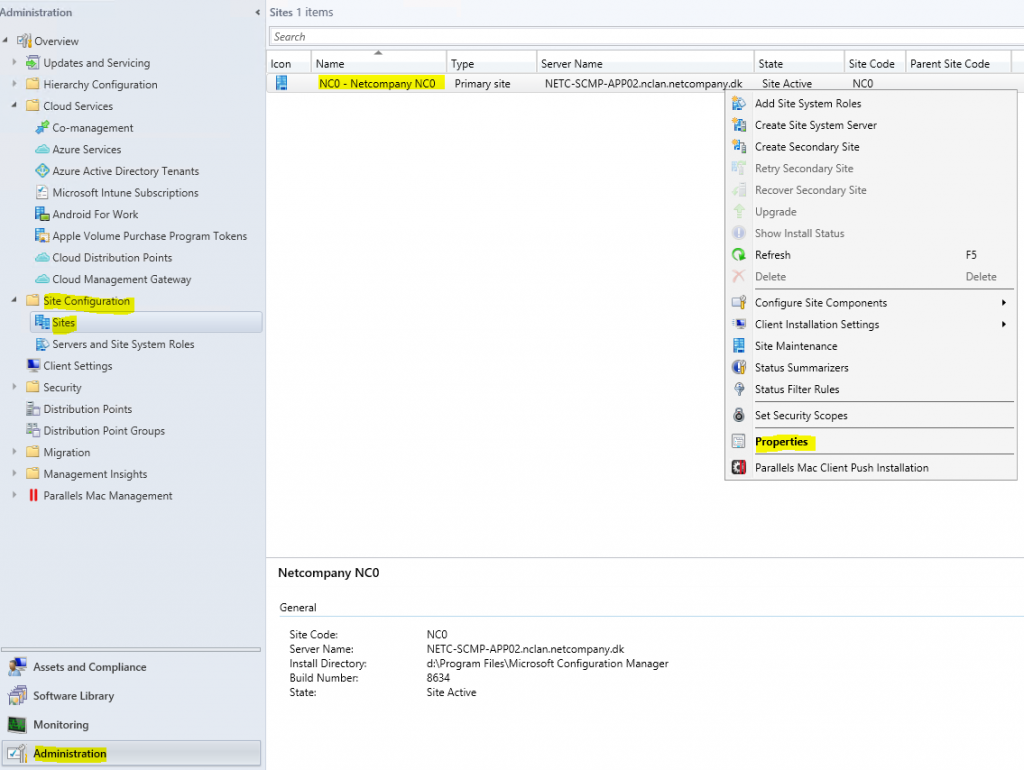
- On the “Client Computer Communication” tab uncheck “Clients check the certificate revocation list (CRL) for site systems”. Click “OK”.

Allow CMG Traffic
In order for a site server to use the CMG, we need to enable so the configuration manager is allowed to sent/receive traffic to the CMG.
- Connect to the SCCM server, and open “Configuration Manager Console”.
- Navigate to “Administration”, “Site Configuration”, right click on “Servers and Site System Roles” and select the site server. Then right click on the “Management Point” role, and select “Properties”.

- Checkmark “Allow Configuration Manager cloud management gateway traffic”. Click “OK”.

Allow Software Update
The following will enable the site server to allow software updates through the CMG.
- Connect to the SCCM server, and open “Configuration Manager Console”.
- Navigate to “Administration”, “Site Configuration”, right click on “Servers and Site System Roles” and select the site server. Then right click on the “Software Update Point” role, and select “Properties”.

- Checkmark “Allow Configuration Manager cloud management gateway traffic” and “Allow Internet and intranet client connections”. Click “OK”.

Client Policy
In order for the clients to use the CMG, we need to enable it through a client policy.
- Connect to the SCCM server, and open “Configuration Manager Console”.
- Navigate to “Administration”, “Client Settings”. Then right click on the client setting for your workstation devices, and select “Properties”. Don’t edit the “Default Client Settings”

- Now under “Client Policy” choose “Yes” for “Enable user policy requests from Internet clients”.

- Now under “Cloud Services”, now set “Yes” to “Allow access to cloud distribution point” and “Enable clients to use a cloud management gateway”. Click “OK”.

- Now create or reuse client policy for users. Right click, and select “Properties”.

- Under “Cloud Services”, select “Yes” to “allow access to cloud distribution point”. Click “OK”.

We have now fully configure the Cloud Management Gateway, in order for the clients to download and install application we need to setup the Cloud Distribution Point. This will be configured in the next part.
5. Cloud Distribution Point
A cloud-based distribution point is a ConfigMgr distribution point that is hosted in Microsoft Azure. The cloud distribution point will allow clients to download content from the internet public interface of the CDP when client in not in the corporate network.
In this part we are going to configure the Cloud Distribution Point.
- Connect to the SCCM server, and open “Configuration Manager Console”.
- Navigate to “Administration”, “Cloud Services”, right click “Cloud Distribution Point” and select “Create Cloud Distribution Point”.

- Specify the Azure subscription ID, then browse to and select the Azure Management certificate. Click “Next”.

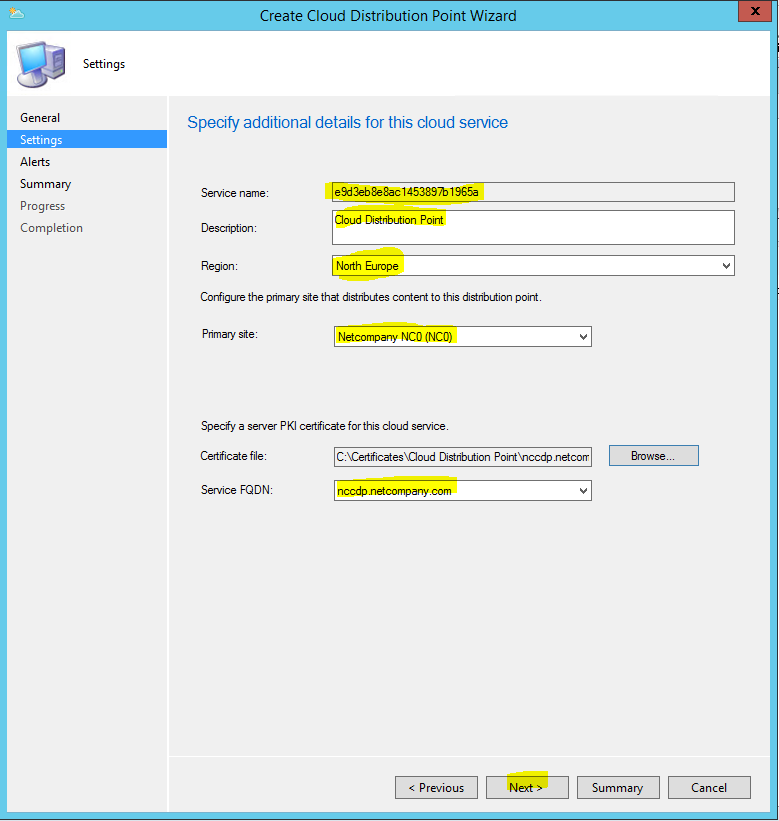
- Note down the service name (ID), and specify the following. Click “Next”.
- Click “Next”.

- Click “Next” again.

- Click “Close”.

- Go to your public DNS provider website, and add CNAME of your cloud distribution point map to that service name. A good idea is to also add it to the internal DNS server.
- cdp.contoso.com
- Type: CNAME
- Data: <CDP service name (ID)>.cloudapp.net.
- cdp.contoso.com
Distribution Point Group
This will add the cloud distribution point to a distribution point group.
- Connect to the SCCM server, and open “Configuration Manager Console”.
- Navigate to “Administration”, “Distribution Point Groups”, right click the distribution group and select “Properties”.

- On the “Members” tab, click on “Add”.

- Check mark the cloud distribution point, and click “OK”.
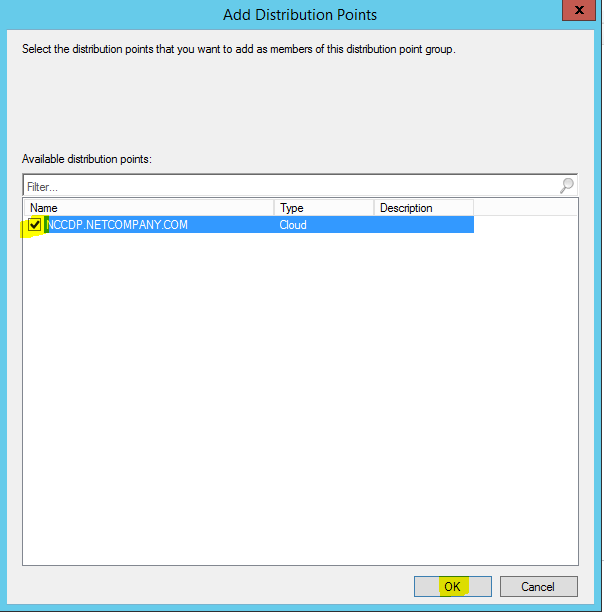
- Click “OK” again.

The CDP is now fully configured, and the final configuration of this series. Next part is an overview of logs I used to debug the configuration and issues.
6. Logs
If you need to check for errors, the following logs are a good starting point.
Azure AD Discovery Agent (Server)
This log display the synchronization for users/devices with Azure AD.
- ?:\Program Files\Microsoft Configuration Manager\Logs\SMS_AZUREAD_DISCOVERY_AGENT.log
Cloud Proxy Connector (Server)
Records details about setting up connections between the cloud management gateway service and the cloud management gateway connection point.
- ?:\Program Files\Microsoft Configuration Manager\Logs\SMS_CLOUD_PROXYCONNECTOR.log
Policy Agent (Client)
Records requests for policies made by using the Data Transfer Service.
- C:\Windows\CCM\Logs\PolicyAgent.log
Data Transfer (Client)
Records all BITS communication for policy or package access.
- C:\Windows\CCM\Logs\DataTransferService.log
Cloud Management (Server)
Records details about deploying the cloud management gateway service, ongoing service status, and use data associated with the service.
You can configure the logging level be editing the Logging level value in the registry key HKLM\SOFTWARE\ Microsoft\SMS\COMPONENTS\ SMS_CLOUD_ SERVICES_MANAGER
- ?:\Program Files\Microsoft Configuration Manager\Logs\CloudMgr.log




Hi Alex,
My CMG is configured, and I’m able to distribute content to the DP, However clients will not install anything from there.!! Client settings are correctly configured but I think I missed something about the DNS Cname record! where should I set this?
Go to your public DNS provider website, and add CNAME of your cloud distribution point map to that service name. A good idea is to also add it to the internal DNS server..cloudapp.net.
cdp.contoso.com
Type: CNAME
Data:
Hi Alex,
we are moving to HTTPS communication between devices and servers so the we can manage MBAM both when imaging a machine and managing it. It requires PKI certs which we will create. I assume that using PKI for communications will work just fine with CMG. Will we need to create all the Certs you have demonstrated above even after we have used AD CS templates for https in configuration manager ?
Thanks, Kevin